01 02 03 Miss Smartie's Sewing: March 2014 04 05 15 16 19 20 21 24 21 24 21 24 21 24 21 24 21 24 25 26 27 28 29

Miss Smartie's Sewing

30 31 32 36 32 36 32 36 32 36 32 36 32 36 37 38 body { background:#aba; margin:0; padding:20px 10px; text-align:center; font:x-small/1.5em "Trebuchet MS",Verdana,Arial,Sans-serif; color:#333; font-size/* */:/**/small; font-size: /**/small; } /* Page Structure ----------------------------------------------- */ /* The images which help create rounded corners depend on the following widths and measurements. If you want to change these measurements, the images will also need to change. */ @media all { #content { width:740px; margin:0 auto; text-align:left; } #main { width:485px; float:left; background:#fff url("https://resources.blogblog.com/blogblog/data/rounders/corners_main_bot.gif") no-repeat left bottom; margin:15px 0 0; padding:0 0 10px; color:#000; font-size:97%; line-height:1.5em; } #main2 { float:left; width:100%; background:url("https://resources.blogblog.com/blogblog/data/rounders/corners_main_top.gif") no-repeat left top; padding:10px 0 0; } #main3 { background:url("https://resources.blogblog.com/blogblog/data/rounders/rails_main.gif") repeat-y; padding:0; } #sidebar { width:240px; float:right; margin:15px 0 0; font-size:97%; line-height:1.5em; } } @media handheld { #content { width:90%; } #main { width:100%; float:none; background:#fff; } #main2 { float:none; background:none; } #main3 { background:none; padding:0; } #sidebar { width:100%; float:none; } } /* Links ----------------------------------------------- */ a:link { color:#258; } a:visited { color:#666; } a:hover { color:#c63; } a img { border-width:0; } /* Blog Header ----------------------------------------------- */ @media all { #header { background:#456 url("https://resources.blogblog.com/blogblog/data/rounders/corners_cap_top.gif") no-repeat left top; margin:0 0 0; padding:8px 0 0; color:#fff; } #header div { background:url("https://resources.blogblog.com/blogblog/data/rounders/corners_cap_bot.gif") no-repeat left bottom; padding:0 15px 8px; } } @media handheld { #header { background:#456; } #header div { background:none; } } #blog-title { margin:0; padding:10px 30px 5px; font-size:200%; line-height:1.2em; } #blog-title a { text-decoration:none; color:#fff; } #description { margin:0; padding:5px 30px 10px; font-size:94%; line-height:1.5em; } /* Posts ----------------------------------------------- */ .date-header { margin:0 28px 0 43px; font-size:85%; line-height:2em; text-transform:uppercase; letter-spacing:.2em; color:#357; } .post { margin:.3em 0 25px; padding:0 13px; border:1px dotted #bbb; border-width:1px 0; } .post-title { margin:0; font-size:135%; line-height:1.5em; background:url("https://resources.blogblog.com/blogblog/data/rounders/icon_arrow.gif") no-repeat 10px .5em; display:block; border:1px dotted #bbb; border-width:0 1px 1px; padding:2px 14px 2px 29px; color:#333; } a.title-link, .post-title strong { text-decoration:none; display:block; } a.title-link:hover { background-color:#ded; color:#000; } .post-body { border:1px dotted #bbb; border-width:0 1px 1px; border-bottom-color:#fff; padding:10px 14px 1px 29px; } html>body .post-body { border-bottom-width:0; } .post p { margin:0 0 .75em; } p.post-footer { background:#ded; margin:0; padding:2px 14px 2px 29px; border:1px dotted #bbb; border-width:1px; border-bottom:1px solid #eee; font-size:100%; line-height:1.5em; color:#666; text-align:right; } html>body p.post-footer { border-bottom-color:transparent; } p.post-footer em { display:block; float:left; text-align:left; font-style:normal; } a.comment-link { /* IE5.0/Win doesn't apply padding to inline elements, so we hide these two declarations from it */ background/* */:/**/url("https://resources.blogblog.com/blogblog/data/rounders/icon_comment.gif") no-repeat 0 45%; padding-left:14px; } html>body a.comment-link { /* Respecified, for IE5/Mac's benefit */ background:url("https://resources.blogblog.com/blogblog/data/rounders/icon_comment.gif") no-repeat 0 45%; padding-left:14px; } .post img { margin:0 0 5px 0; padding:4px; border:1px solid #ccc; } blockquote { margin:.75em 0; border:1px dotted #ccc; border-width:1px 0; padding:5px 15px; color:#666; } .post blockquote p { margin:.5em 0; } /* Comments ----------------------------------------------- */ #comments { margin:-25px 13px 0; border:1px dotted #ccc; border-width:0 1px 1px; padding:20px 0 15px 0; } #comments h4 { margin:0 0 10px; padding:0 14px 2px 29px; border-bottom:1px dotted #ccc; font-size:120%; line-height:1.4em; color:#333; } #comments-block { margin:0 15px 0 9px; } .comment-data { background:url("https://resources.blogblog.com/blogblog/data/rounders/icon_comment.gif") no-repeat 2px .3em; margin:.5em 0; padding:0 0 0 20px; color:#666; } .comment-poster { font-weight:bold; } .comment-body { margin:0 0 1.25em; padding:0 0 0 20px; } .comment-body p { margin:0 0 .5em; } .comment-timestamp { margin:0 0 .5em; padding:0 0 .75em 20px; color:#666; } .comment-timestamp a:link { color:#666; } .deleted-comment { font-style:italic; color:gray; } .paging-control-container { float: right; margin: 0px 6px 0px 0px; font-size: 80%; } .unneeded-paging-control { visibility: hidden; } /* Profile ----------------------------------------------- */ @media all { #profile-container { background:#cdc url("https://resources.blogblog.com/blogblog/data/rounders/corners_prof_bot.gif") no-repeat left bottom; margin:0 0 15px; padding:0 0 10px; color:#345; } #profile-container h2 { background:url("https://resources.blogblog.com/blogblog/data/rounders/corners_prof_top.gif") no-repeat left top; padding:10px 15px .2em; margin:0; border-width:0; font-size:115%; line-height:1.5em; color:#234; } } @media handheld { #profile-container { background:#cdc; } #profile-container h2 { background:none; } } .profile-datablock { margin:0 15px .5em; border-top:1px dotted #aba; padding-top:8px; } .profile-img {display:inline;} .profile-img img { float:left; margin:0 10px 5px 0; border:4px solid #fff; } .profile-data strong { display:block; } #profile-container p { margin:0 15px .5em; } #profile-container .profile-textblock { clear:left; } #profile-container a { color:#258; } .profile-link a { background:url("https://resources.blogblog.com/blogblog/data/rounders/icon_profile.gif") no-repeat 0 .1em; padding-left:15px; font-weight:bold; } ul.profile-datablock { list-style-type:none; } /* Sidebar Boxes ----------------------------------------------- */ @media all { .box { background:#fff url("https://resources.blogblog.com/blogblog/data/rounders/corners_side_top.gif") no-repeat left top; margin:0 0 15px; padding:10px 0 0; color:#666; } .box2 { background:url("https://resources.blogblog.com/blogblog/data/rounders/corners_side_bot.gif") no-repeat left bottom; padding:0 13px 8px; } } @media handheld { .box { background:#fff; } .box2 { background:none; } } .sidebar-title { margin:0; padding:0 0 .2em; border-bottom:1px dotted #9b9; font-size:115%; line-height:1.5em; color:#333; } .box ul { margin:.5em 0 1.25em; padding:0 0px; list-style:none; } .box ul li { background:url("https://resources.blogblog.com/blogblog/data/rounders/icon_arrow_sm.gif") no-repeat 2px .25em; margin:0; padding:0 0 3px 16px; margin-bottom:3px; border-bottom:1px dotted #eee; line-height:1.4em; } .box p { margin:0 0 .6em; } /* Footer ----------------------------------------------- */ #footer { clear:both; margin:0; padding:15px 0 0; } @media all { #footer div { background:#456 url("https://resources.blogblog.com/blogblog/data/rounders/corners_cap_top.gif") no-repeat left top; padding:8px 0 0; color:#fff; } #footer div div { background:url("https://resources.blogblog.com/blogblog/data/rounders/corners_cap_bot.gif") no-repeat left bottom; padding:0 15px 8px; } } @media handheld { #footer div { background:#456; } #footer div div { background:none; } } #footer hr {display:none;} #footer p {margin:0;} #footer a {color:#fff;} /* Feeds ----------------------------------------------- */ #blogfeeds { } #postfeeds { padding:0 15px 0; }

Friday 28 March 2014

The Joan dress pattern construction

I started work on the Joan dress for the mad man competition. I'm seriously doubting weather I will be able to finish it before the deadline, but school has been enormously busy lately. This is how I adjusted the basic sloper pattern I made earlier to make the Joan dress I discussed in the construction drawing post earlier this month. I made some photo's during the process, but since it's usually a lot of trial and error for me I doubt I can show you guys a really clear step by step tutorial on how to draft this dress for yourself. I have jet to make a muslin for this project but I will be sure to add any changes I need to make to this description later on.

note: I did do a muslin before publishing this. I made a lot of changes mainly because I had the waistband marked to low at first and because my side seams where off by two cm. A mistake I made in my sloper pattern but only caught up on while making the muslin. This caused a lot of trouble to get right the second time. But the good news is If you get it right the first time it won't trouble you at all. I will add the pictures to this tutorial after finishing the dress.

If you want to do this process for yourself just follow the steps I discus below. Be sure to copy your basic sloper and all of it's construction lines first.

The back of the dress

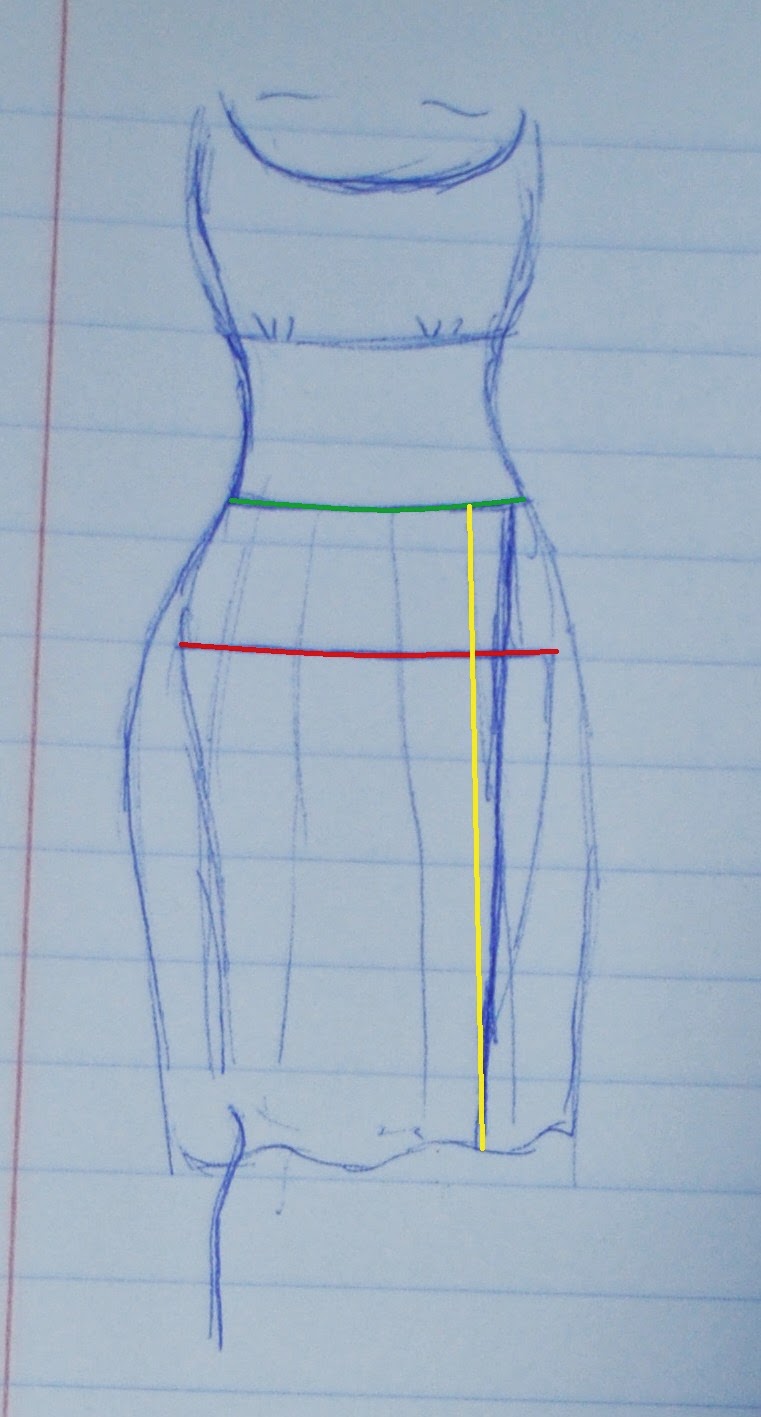
I like to add all of the horizontal lines in my construction drawing first before manipulating any darts or existing construction points. That way I can separate the pattern pieces before changing them. I started out by deciding where the waistband should go. I decided to place it evenly around the waistline and make it 5cm wide. I marked this on a my dress sloper (not the original) and just drew a straight line parallel with the waistline 5cm above the waistline.

Next I checked the length of the dress and figured that I needed some extra cm to get it to the right just over knee length. I measured my waist to length of skirt measurement from scratch and simply added the extra cm at the bottom.

The last horizontal line in the back of the dress is the yoke. I wanted it to curve in a little and start somewhere halfway up the armhole. I took the existing construction line of the with of back measurement and measured 2 cm up from there. I then connected these two points with a French curve, intersecting the very tip of the shoulder dart. This makes the adaptation somewhat easier.

I then cut out all pattern pieces along these horizontal lines. Separating them into a back bodice, back of waistband, back skirt and back yoke.

Manipulating the back darts

Let's start with the easier pattern pieces. For the yoke I just folded the dart shut and taped that down. Since the dart separates the whole part in two I didn't have to do anything else. I did the same for the waistband, making sure that I left in all of the required room. That means I only folded in the dart parts that crossed the entire pattern piece vertically.

Next came the back bodice. I wanted the dart to start in the middle and go up at an angle in the direction of the shoulder blades. I drew the new dart line I wanted in and cut the pattern open along this line and along the original dart line. I then just taped the original dart shut as precisely as possible. The new dart automatically opens up the required space.

The most difficult part of the back of the dress is the sunburst pleated skirt. I wanted some special details here that would mirror the pleats in the front dress but at the same time elegantly stress the female shape. I drew in several pleats with varying lengths. To get these onto a pattern I first figured out where I wanted the pleats to go and how long I wanted them to be, this process is arbitrary. I made the middle pleats longer and matched them to the new darts in the back bodice. I then drew in two shorter pleats in a sunburst pattern, experimenting a bit to see witch lines pleased me the most. After doing that It's smart to mark these lines clearly and mark where you want your pleat to end. Since these pleats are meant to add a little extra fabric you will have to cut them open beyond that point. I cut them all until the hip line and then cut them loose again. I put all these pattern pieces on top of some pattern paper and started tracing around. I started piecing the pattern together adding the extra fabric I wanted in between the ends of the darts. (1cm). I did this by laying out the pieces and shifting them around. The pattern pieces shouldn't overlap at the hip line or your pattern will be ruined. You have to move the pattern piece up to solve this. The finished piece should look something like this.
original dart

Front of the dress

The front of this dress is tricky in all of its simplicity. Lets start with the easy parts. Mark of the waistband as before 5 cm on top of the waistline. Lengthen the skirt by the same amount as you did in the back. Decide on where the front yoke should go. This is a bit tricky since the shoulder dart is in the way now. Draw a line from where you think it should go to the dart. At the angle you want. Measure from the shoulder along the dart line how much you have taken away. Measure the same length on the other side of the dart and mark that point. Draw a line from this point to where you think the yoke should end. Cut these parts out and paste them together along the dart line. Add the front yoke to the back yoke at the shoulder seam.

Fold the darts of the waistband shut and tape them down. Add front and back waistband together by putting the points of the pattern together and adding some extra room where the side seam would normally go. Trace around this entire piece and tape together at the right seam.

The skirts construction is very similar to the back skirt. Just close the original dart and mark of the pleats. The only difference between back and front is the placements of the darts (at regular intervals in the side half of the pattern piece, at a slight angle and 2.5 cm long. I also added 1cm of fabric in between the darts and cut these open rather far. Folded open the pattern and taped everything in place.

The front bodice is the most complicated part of the dress. The collar is really defining for the cut and the pattern needs a lot of adjusting. I changed the original darts first and then started worrying about the collar. I simply increased the height of the original vertical dart so that it reaches slightly beyond the bust point. I then cut both darts open and closed the top dart, taping it shut. The new dart is a wider version of the original dart.

For the right part of the collar I drew the neckline down by hand in a way I thought resembled the picture. I messed this one up hugely first time around. I recommend using a sewing dummy with the sloper pattern lines visible on top of it while trying to judge this. You will have to go reasonably low since the collar will otherwise smother you. I'll add a picture later of this pattern piece with the Original sloper neckline, my first and my corrected neckline. I just drew this on my muslin while fitting and transferred to the pattern later on. It's still in a curve that is sort of pointed.

If you have drawn in the neckline you can now measure the length of the collar. just measure along the line you drew with your tape measure curved. Do not forget to add the yoke part of the neckline twice since that's cut on the fold. This will be the width of your collar pattern. For the height you will need to decide the look of your collar yourself. If you want a 5 cm collar you will need this twice and a standing piece of 4 cm twice as well. this was much to much collar for me so I took it down 1.25 cm on all of these measurements for my second sloper. Write these measurements down somewhere, we have to make the front collar piece first.

the front collar flap is a rectangular extension of the Original bodice. extend the bodice piece until the fold. this is until the left bust dart for me. draw a line perpendicular to the bottom of the bodice and up. decide where you want the folding point. this is more or less at the same height as the darts. (You can just draw a line from the tops of the darts till the side to determine this point. connect this point to the start of the shoulder and draw a square with this line as a diagonal. If you used this pattern you would just have a straight flap. looking at the picture however the fabric is folded over and the collar extends into the front flap. to get this effect measure up half of the collar height measurement you took. (so if you did 5 cm and 4 cm stander you would have 9 cm here.) square this of and make a rectangle on top of the square. the collar will connect to this flap on the straight line from shoulder to the top. The only thing you need now is a facing for this part (since if it flaps over you would normally see the wrong side of the fabric. put a piece of pattern paper on top of the pattern you just drew. copy the lines of the rectangle and the shoulder. Decide where you would like the facing to end along the shoulder seam. connect this to a point you choose along the bottom of the bodice. I took the dart placement since then I can connect my pattern piece to the left bodice part. In a subtle way. tape the rectangle you drew for the collar to this piece at the left vertical line of the rectangle, connected to the shoulder. you should have half of the collar piece taped to the rectangle and half of it sticking out of the top.


Labels: , , , , ,

Saturday 22 March 2014

Pretty petticoat: Tutorial

The following tutorial will teach you how to design and make your own petticoat. It's based on a project I did in the past and updated to deal with some mistakes I made during that first construction. If anything in this tutorial is unclear, don't hesitate to ask or comment below.

Equipment: 

Fabric amounts given below depend on your own designing choices, I would recommend to buy extra fabric or work out the maths before buying the fabric. The given amount should give you enough fabric for a petticoat measuring around 70 cm from waist to hips. What size you are doesn't matter a lot for the tulle since you will be gathering lots of extra fabric in anyway.
  • Four meters of tulle
  • One meter of lining fabric
    •  I would recommend a stretch satin, or any other stretch fabric
    •  You will need at least  the length of the skirt + 15cm, If your hip circomference+6 cm is bigger than your fabric width, add some extra yardage as well. 
  • A lot of sewing thread match this with the lining fabric. I think we used around one whole bobbin.
  • Some 2.5 cm wide elastic 
    • as long as your skirt's "waist" circumference
  • Pins
  • Patience

Measurements

You will need following measurements for this tutorial:
    hip circumference
  •     This is your regular hip measurment. Add 6 cm wearing ease to this measurement.
    circumference of the waist 
  • This is the place you want the skirt to sit, this can be lower than your actual waist.
  • Measure your waist of skirt circumference 2.5 cm higher than you would like the petticoat to start giving fullness. (This is to account for the 2.5 cm's of elastic used in this project). 
  • Add 2 cm to this measurement for wearing ease.
    length of the skirt
  • measure from the circumference of the waist to the point you want your skirt to end.
  • I recommend basing this value on the shortest dress you want to wear this petticoat under. Petticoats are usually 2 cm shorter than the skirt you wear them with (to make them invisible).
  • To measure this tie a ribbon around your desired waist circomference and let someone measure down from this point to the hem of the shortest skirt you want to wear a petticoat under. substract 2cm from this measurement to make the skirt invisible.
For example I made mine: Hip circumference 88 cm, Waist of skirt circumference 72 cm (the skirt sits at the high hip measurement), Length of skirt 42 cm. This gives a fairly short (above knee) petticoat.

Deciding on the form and fullness

The next step is the most fun and important one. It's time to decide on the shape and the fullness of your petticoat. There are a few factor's you can manipulate to change these.

The length of your petticoat will decide a lot about it's shape. The shorter you make it, the less effort you will have to make (read fabric you will have to invest) in making the skirt really full. Shorter petticoats worn under long dresses will however be visible since the unsuported fabric will drop vertically down. (picture on the left).


Another very important aspect is the length and number of the individual strips of fabric. The more strips you have the more dramatic increase in the amount of  fullness. And off course the more fabric you will need. Regularly petticoats have 3 or 4 tiers. (The more tiers the more work)

Different shapes petticoats can have.
The height of these tiers is crucial in defining the shape of your skirt. Are the top tiers short and the bottom ones longer? You will achieve a bulging full clock effect, do it the other way around and you will get a swingy low fullness. You can make all sorts of shapes if you combine this with the amount of fabric and gathering involved. For example in my petticoat I used four strips or tiers from the top till the bottom with heights: 8cm, 8cm, 12 cm, 14cm. This makes my petticoat bell shaped, witch is good for a typical retro look.

The amount of fabric you increase in every tier (total length of each tier) will have a large impact on the fullness as well. The petticoat is constructed by gathering long strips of fabric to shorter strips of fabric. The more these strips differ in length the fuller the skirt will become at that level. The more difference in length the more dramatic the change will be on this layer. If you are aiming for a normal clock petticoat be sure not to go top dramatic, you want to keep the petticoat looking round not zigzag. I used a difference of 2 m for each strip in my petticoat. 2,4,6,8 or 3,6,9... are combinations that are often used. Most important in this is to keep the increase in fabric gradual to keep a nice and curvy shape.
The outer left skirt hasn't got enough fullnes, While the third one from the left has too much. The difference between the layers doesnt give a smooth transition. The right one has to little fullnes in the top part and is ok in the bottom part.


These guidlines can help you make any shape of petticoat you want. Completley understanding them or designing your petticoat from scratch is'nt really necessary. I'll give you the correct measurements for a kneelength and a short petticoat in the next chapters, both resulting in a normal retro bell shaped look. These measurements work fine for me and have also been tested on larger sizes. 

Working out the pattern pieces

After deciding this you can work out how much fabric you will need. I ended up drawing myself a little schedule to keep track of things. You will need to know the height and length of the tiers.

Height of the tiers: just divide the skirt length you want by the amount of tiers you have decided on. Then redistribute these values until you have an effect that you think will look pleasing. For example: I wanted my skirt to be 42 cm long. I divided this by 4. So I had 10.5 cm. I wanted a clock effect with shorter tiers on top and longer at the bottom. So I took some of the height away at the top tiers and gave it to the bottom tiers.  It's important to add an extra 1.5 cm seam allowance to all of these tiers!

Length of the tiers: This will be decided by how much fabric you want to add per tier. You will have to start from the highest tier. In the finished skirt this is the part that will really define the start of the curve. You will have it gathered down to the hip circumference in the finished project. Start from that knowledge and decide for yourself how dramatic you want your skirt to be. (I used 2m gathered down to 88cm). If you have a wide hip circumference 3m will get a more dramatic effect. for each following tier I added another 2 m of fabric.

The following is a schematic of how I cut out my tulle strips for my petticoat. You will need 4 m of tulle, 77 cm wide (wich leaves you with a bit of extra since tulle is usually 1 or 1.2 m wide). At the left side you can see the heigth of the tiers with the seam allowance, at the bottom of the tiers you can see the length of the strips. The total length of this petticoat was 42 cm. (click image to enlarge)


You can make a similar scetch if you want your own design or just copy this one. At the end of this paragraf you'll find one for a longer petticoat (with a total length of 60 cm). Note that you will have to stitch some tiers together since the strips are longer than the fabric we 'll be using.

An important point to note here is that you should cut the upper tier twice. This tier is used double to give the first layer extra strength and to compensate for the weight of the lower tiers. When you do not do this the skirt would be considerably less round in the upper hip areas.
This is an example for the pattern of a longer petticoat. The main difference is the with of the tiers, wich you can see at the left of the scematic.


Cutting and marking fabric

Lay out the lining fabric wrong side up. draw a rectangle as wide as your hip circumference + 3 cm total seam allowances + 6 cm wearing ease (do not forget this). The height of the rectangle should be the length of your skirt + 1.5 cm seam allowance + 4 cm for the double folded hem. Draw another rectangle with the same width and a height of 10 cm. (This will become the separate waistband). Cut those out and finish the edges so they do not fray.

Lay out something on the table that can become stained. We will be marking the tulle with regular felt tips. (No one will see this and otherwise you won't see where to cut). Lay out as much of the tulle flat as will fit your table. Ideally this will be part of the length and the total width. Measure out the width of each tier as many times as you have need of them but add 1.5 cm seam allowance. (Refer to your own sketch you made in the last step in doing so.) You can see on the picture of the sketch above that I numbered the tiers and that I numbered the measurement from the top. I just added up all of the numbers so I could quickly reference them and put felt tip marks on the correct spots. Measuring goes like this. Put the measuring tape perpendicular to the long side of the fabric. Measure out the tier borders quickly by using the measurement chart you created. Move a meter farther down the fabric. Do this again. connect the dots. start cutting the fabric on these lines. Move the fabric down. Measure the tiers again, 1 m further in. connect these dots with the lines you have cut. cut along these lines. Repeat until the end of the fabric. Mark the fabric with the number of the tier. Do not forget to cut the upper tier twice.

Sewing the petticoat

Next part is the fun one. And the mind numbingly boring one at times. Start sewing. One of the fun things about tulle is that it doesn't require finishing, and that its nearly impossible to do so. There is no need to take measure against fraying. Tulle does tear easily when caught on something sharp.

1. Connect the tiers that are made out of different parts at the side seams so they form one long long long strip. (For example if you need a strip of 8m and you started out with 4m of fabric you will have cut this out in two strips measuring 4 m, and you can now connect these)

2.  Pin the first tier on itself (you will have a double layer of tulle now) and baste 1 cm from the top with your largest machine stitch. Do this for all the tiers (to make gathering easier).

3. Pin the end of tier 4 to the end of tier 3, while gathering. The basted edge of tier 4 should be against the non basted edge of tier 3. This may sound easy, but the amount of fabric made this a really hard step. After the classical method of trial and error I ended up with the following technique.

To gather evenly you will need to pin the tiers together at regular intervals. To do this in the most efficient way I ended up measuring the short tier (lowest number, the one closer to your waist) and put a pin at regular intervals that I decided on arbitrarily. I used 0.5m for all tiers except the last ones.
Next you will have to work out how much of the long tier you have to spare for each of those intervals. (for example if you are gathering a 8m tier to a 6m tier, you will have a total length of 2 m to distribute). I found that it was easiest to work this out in the following way: I asked myself how many times the interval I chose went into the short tier. (If you pinned this one already you can just count them). For example: 6m : 12 = 0.5m. Next just divide the length of the long tier by the same amount you have divided your shorter strip. In our example: 8m :12 = 0.66m. You will have to measure 66cm before pinning it to the already pre pinned tier.

Make sure not to twist the fabric while pinning. The same side should be up at all times. Start gathering using the basted stitch. I found that this was easiest while sewing. Put your needle in starting position and the pressure foot down. Gather the portion of the longer strip you have so it matches the shorter one on your machine. Check this by pulling both tight. distribute the gathers evenly and pin. I would recommend sewing to fix these down immediately after to prevent double work when having to start over due to vanished pins.

Add tier 2 in the same way, and guess what, tier 1 as well. Put this heap of tulle aside. The hardest part is over.

4. Put the waistbands good side onto the good side of the lining along the long upper edge (the one with the width of the skirt). Stitch this seam 1.5cm from the side. Press up toward the waistband. Pre press the waistband in to, pressing in the top seam allowance firts and then the rest of the waistband double. Press the hem at this point as well.

5. Stitch the side seam of both of the skirts shut.

6. Put the tulle skirt in between the waistband sandwich. Gather the top tier to the length of the lining. Do this like described in step 3 but use 0.25 m instead of 0.5 m. Stich this down twice. Leave a gap about 2 cm somewhere in the skirt. This is where the elastic will go.

7. Finish the hem.

8. Cut a piece of elastic slightly smaller than the circumference of the waist (the measurement from the beginning). Insert this into the tunnel. Stitch together.

9. Finished!


Labels: , , , ,

Saturday 15 March 2014

Past projects part 2: the pretty petticoat


My best friend is crazy about the 50'ies and she has wanted a petticoat for years. A while back we got adventurous and decided to make one of our own. We went and bought 8 m of tulle and some satin (I think 1.5 m for the both of us). In the end I would recommend more fabric for the lining, since we ran a bit short (my bad for forgetting the wearing ease mostley). We chose a bright neon green since we really were feeling adventurous, and I do like the way it turned out. It's pretty lively and looks pretty peeking out of your dress.

I had been searching the web for the perfect petticoat pattern for ages and hadn't found anything that I really liked, so I made the pattern for this petticoat myself with tips and tricks I picked up from loads of other tutorials. Drafting this pattern isn't difficult at all, but since there are so many options it can get confusing.

I do love the possibility's of petticoats, especially for bridal and evening wear. You can really make any shape you like to enhance the shap you have. I think I might like a mermaid one as well, one day. I do recommend tackling this project with two people since that really came in handy while cutting the fabric. We ended up spending  a day on the cutting alone. But in the end, it's quit cheap to make, compared to a purchased one. I think we spend 6 euro on the tulle and 3 on the satin (per person) and 3 for thread, and yes you will need a lot of that. Compared to prices asked for petticoats in stores, that's saving bundles.

The construction turned out to be slightly trickier than I antisipated. But it's still fairley straightforward if you've ever used a sewing machine before. It does involve lots of gathering and pinning and that can be a bit tricky if you've never done that before. If you are teaming up for this project it's easiest to have one person pin and the other person gathering. The last reason why I would recommend teaming up for this particular project is that gathering and pinning yards and yards of fabric can get a little boring without propper company.

The Petticoat underneath a dress. 

Since we only had limited time to finish this project it got a little stressy resulting in me making a lot of beginners mistakes that only slowed the proces down even more. I for example forgot the wearing ease while cutting out the inner skirt. I ended up having to insert a strip of fabric, since the leftovers weren't large enough for a new piece.
I also should have used two different pieces of fabric for the waistband and the lining since now the good side of the lining is facing inwards, but since the petticoat is see through it looks a bit weird.
I regret not making the lining in a stretchier fabric that would make walking a tad easier.
I ironed the lining separately since you cannot iron tulle (it will melt). This gave me the crisp crease I wanted in the hem and the waistband.

Conclusion: I'm really happy with how this project turned out. the petticoat is very versatile and cheap compared to a bought one. It did take quite some time to make but I feel it was totally worth it. Although I made some mistakes in the pattern, I've got a good idea how i'll fix them next time around. Since It's an undergarment no-one will notice anyway so I cant be botherd unpicking it all.

I will make an in depth tutorial on how to make this or any other petticoat in my next post.


Labels: , , ,

Thursday 13 March 2014

Past projects part 1: the sunburst skirt

I fell in love with this skirt the moment I saw it. Simple jet elegant. I knew I had to make one for my own.

Pattern Description:

The pattern description told me that the look accentuates the silhouette, because of it's length and the pleating at the hip.

Pattern sizing:

I made a size 34, but I think you should let the stretchiness of your fabric decide on the sizing.

Did it look like the model photo?

It did! Except that I made the separate facing piece and then decided that I liked the stripes in the opposite direction that much that I left it turned out.


Where the instructions clear enough?

The instructions where pretty clear, but I did get confused as to witch direction the pleats should be sewn down in. I made this skirt three times this far and I got confused every single time. I made it both ways and think both turned out looking OK, so in the end it doesn't matter that much.

What did you particularly like or dislike?

I really like the silhouette of this skirt and the way the pleats make it look as if I've actually got some hips going on. I dislike the fact that you either have to use very stretchy fabric (that will become saggy after washing and wearing) or you cannot get the pattern on. I recommend using a zipper with less stretchy fabrics. The pleats take up a lot of room and are very bulky in the design. I end up with a strange bump on my hip, which is less apparent with thicker fabrics.


Fabric used


I got the crazy idea to make a striped version, since i do love stripes... I didn't really think of how the stripes would turn out on the skirt, but I was mightily pleased with the result. I really love how the skirt makes my hips look fuller and accentuates my trim waist. I think this is largely down to the stripes.

I used a lightweight jersey nit fabric, this is a lot thinner than the original fabric. Although it did stretch pretty well as the pattern instructions demanded I still had difficulty getting the skirt on. I did a second version in a leftover black winter knit (because who doesn't love black skirts?) and couldn't even get it on! Well I could, but it broke my back, I ended up sewing a zipper into it. I recommend two way stretch fabrics for this skirt (since that will eliminate the problem where the grain changes so much due to the pleats that the top isn't stretchy enough anymore, or using an invisible zipper.) If you want to hide a tummy a thicker knit is probably the way to go.

Will you sew it again? recommend to others?

I already did sew it three times, twice for me and once for my friend. I loved all of the results. My friend is a lot curvier than I am around the hips and the skirt really flattered her as well. I really recommend this skirt since it's so easy to whip up, pretty versatile and so classy.


Me being all retro with an army hat


Labels: , ,

Tuesday 11 March 2014

Fabric Fair haul

As I told you before I went to a fabric fair this weekend and I wanted to share the fabrics I bought there, and what projects I plan to use them for.

Firstly I bought this cute black polka dotted fabric for a Mc calls summer dress. I actually wanted stripes, but since I found this for two euros a meter well, what can I say... I have tons of striped clothing in my closet anyway...


Then there's tons of creamy white fabric, this might become a Marilyn Monroe dress, or just a couple of shirts, since my favourite ones all got pink in the washing machine some time ago. I love the Monroe dress, although I think it won't flatter my figure, and it's one of those dresses that will stay in the closet most of the time, on the other hand, my copy cat side is itching for it, and I would actually like to experiment with pleating fabrics at home.


Then there's a dark teal fabric that I plan to combine with Orange-Yellow ribbon to make the Butterick pattern I told you about in my first post. I'm really in love with this colour!


I also bought a nice and warm looking fabric at another incredible discount for the Joan dress. Since it's spring here, winter fabrics where hard to find and I really had to look for something that could emulate the coaty look of the dress. I think with enough interfacing this fabric might just pull that off.


Lastly I purchased tons of fabric for the Vogue evening dress. Since i could not find any chiffon anywhere (for less than 40 euro a meter, since I needed 6 that was not an option...), and not in the colour I wanted, I had to settle for these mint green coupons. I've never wore mint so I'm kinda anxious to what the result will be, since I was aiming for more of a teal colour. Might change my mind on this fabric in May on the next fabric fair.


Lastly, well really lastly, I bought something cute for my boyfriends birthday, but I'm not telling. Only that I will blog about it, after his birthday that is.


Labels: , ,

Sunday 9 March 2014

The basic dress sloper: drafting tutorial

Now for the drafting of our sloper. If you are reading this you should have gathered the materials listed in the previous post and have an accurate set of your body measurements.

The paper: 

set out with a piece of pattern paper measuring half of your bust measurement + 15 cm wide and the length of your body -50 cm.

Adjusting measurements for ease:

Something crucial in making garments is ease. This will allow you to actually move in the clothing you design. There is a minimum wearing ease that is 6 cm in the bust area, 2 cm in the waist and 4 in the hips. Some sources will list other measurements, but these values work for me. I like to keep my wearing ease as small as possible and let the design ease take care of itself in the design process. Mark the extra values on your list of measurements and make the calculation. You will need to use these measurements multiple times and it's easy to forget to add the extra cm at one point. This will ruin your garment for you. That's why it's important to have the new measurement clearly on your list of measurements while working. (This will also save you the headache of having to start a garment over when you forget your wearing ease)

Half and quarter measurements

Since This is a pattern that's meant to go on the fold of the fabric it only pictures half of your body. That's logical since your body would normally be symmetrical and this saves us a lot of pattern paper and it makes drafting and cutting the pattern a lot easier. Because of this we will be using a lot of half and quarter measurements. Do not freak out, the garment will end up with the right measurements! We quarter measurements since half of our drawing will be half of the front body and the other half will be half of our back. (Made more sense in my head) You will see what I'm getting at here wile we are drafting...

The basic layout

Draw a line parallel with the bottom of your paper. This will be your knee line. I like to make a real dress sloper out of these patterns because I tend to make mostly dresses. You could do a shorter version ending at the hips. Drafting the whole thing enables me to mark some standard lengths for my skirts, which saves me a lot of time while drafting, since I tend to want to measure how log I want something to be, then start trying to measure myself, ending up with a measurement that's completely wrong, realising this, just guessing what length I will need, reasoning that I can always cut of the excess fabric and measuring some extra, and then waste fabric or end up with a super fat hem for being lazy and not cutting the excess off.


Ok, sorry for drifting off topic, next you draw to lines perpendicular to this first line and logically parallel to the side edges of the paper. Do this approximately five centimetres from the edge of the paper. The black line in the picture should measure half of your hip measurement + 5 cm. These two lines will be the centre back and centre front of your block. Mark these if you feel like doing so. I like to add the cut this pattern on fold symbol with the arrows on these lines.

Next measure your waist to hip length on both sides of the pattern. Connect these points by squaring of of the sides or with a long ruler. By measuring both sides you ensure that the line you draw is straight and parallel to the knee line. (This is important for a good fit and an accurate pattern). The line you just drew is your waistline. (indicated in orange above) I like to mark that in a subtle way, just to make things easier for yourself. You can also inscribe your waist measurement and the amount of ease you used here.


You can already see we are going along a perpendicular to the sides parallel with the knees and waist theme here. Its just easy to add these construction lines all in one go. Measure the waist to hip measurement down from the waistline on both sides. Connect these points or square of from this point. This is the hip line.

Next we are going to construct the bust line. This is in fact the line where our armholes will begin and lies above the real bust line. To do this, measure the height of the arm and subtract 2 cm from that measurement. These two centimetres are necessary to be able to move your arms in your pattern. Square this line off like you did with the previous measurements.

The side seams


We can now start constructing the side seams. Since our body will always be bigger at the front than at the back at bust level (yes even if you have small breasts) we have to do something to take that difference into account. By making the front bodice bigger than the back bodice we actually move the side seams back and into place. The amount of difference between front and back bodice differs for different breast sizes, as a rule you should add 1.25 cm for every cup size you have. So an  A would add 1.25 cm, a B would add 2.5 cm, a C would add 3.75 cm,...
To construct these lines measure one fourth of the bust circumference minus the difference for your cup size from the centre back line and mark that point. Square off or measure the same distance on the waist and hip line and connect the points. Since these are construction lines, you can leave them as dotted lines or draw them in pencil.  Measure one fourth of the bust circumference plus the amount required for your cup size for the front bodice from the centre front seam. Mark that point and square off as before.

We are off course no rectangles (or at least we hope we are not). In the next step we will take the form of our hips into account. Some women's bust is larger than their hips, for others it's the other way around. To figure out what applies to you, you can just see which of your body measurements is bigger. That doesn't take into account how much bigger though. That is why we will subtract half of our hip measurement from half of our bust measurement. That way we know exactly how much difference we have to take into account. If the result you get is negative, your hips are larger than your bust (you can double check if you like), you will have to add half of the result to the dotted line you drew earlier. (Adding needs to be done away from your centre front and back line so right of the left dotted line and left of the right dotted line (-a in the picture). If your bust is bigger than your hips you will have a positive result. measure half of that result off of the dotted lines (a in the picture).

Measuring up


Measure the back length on the left side starting from your waist. This determines where your shoulder and neck seams will go. Square off with a temporary line. Next measure the over bust length to determine where your shoulder should go at the front. Square off with a temporary line.


Waist not


You might have noticed that the potato sac we've currently drawn is far to big in the waist. This is of course remedied by waist darts and adjusting the side seams. To determine where the waist darts should measure half of the bust separation from the centre front. Square off with a temporary line. Use the same measurement at the back, but this time subtract an additional 0.5 cm. Square off as seen on the picture.

To calculate how much excess fabric we have to remove subtract half the waist measurement from half of the bust measurement. As we have four places to remove this excess fabric .... the resulting measurement by four. Since it will give a nicer finish to take more fabric away at the side seams than in the darts add 0.5 cm to the amount you will measure at the side seams and subtract 0.5 from the amount you will take away at the darts. You can now mark the orange points in the picture. Make sure to measure half of the dart width to the left and half of the dart width to the right of the dotted line. (as more or less seen in the picture)


Some last points to mark. Our bottom is bigger at the back than the front. That's why we will let the dart end somewhere above our hip measurement. This allows for some extra room. The amount used here is usually 2.5 cm. This is however arbitrary and can be changed to your liking. The same goes for your breast measurement. Remember how we said in the beginning that our bust line was actually our armhole line? You will have to determine the placement of your real bust point. Do this by measuring your bust point to waist measurement up from the waist over the dotted line. Mark that point as Bust point. (This is a handy reference point in later pattern adjustments. 

In the next step simply connect all points as seen in the picture on the right.


Because our hips are curved in real life, we're going to curve them too. measure eight cm down along the side seams from the waist. Measure out 1 cm parallel to the waist (perpendicular to the dotted line you drew in). Connect these three points with a French curve. 

Draw a straight line down from the hip to make the side seam of the skirt.


Shoulder and neck seams


Measure 6 cm from the centre back along the line you drew earlier, this is a fixed measurement for the neck. mark this point. Measure another 9 cm to the right and 3 cm down. Mark this point as well. Do the same for the front bodice. The only difference is that the fixed measurement there is 6.5 cm.
Now you can draw the shoulders. Connect the two points you made earlier with a straight line, exactly the length of the shoulder measurement. Add 1 cm to the line in the back bodice. These are temporary lines  and will have to be adjusted later on.


Next we will determine the neck depth. at the back this is another arbitrary measurement, usually 1 cm. In front use the neck depth measurement you took. Connect all lines with a French curve. 

Armholes and shoulder darts


Measure the line resulting between the neckline and bust line. Divide by two, but mark the point 1 cm below half of the line. Measure and mark half of the cross back width. Connect the three points with a French curve.


Now for the other arm. This will be a bit trickier. Divide the line between bust and neckline by three. Measure one third down from the neckline and draw a temporary line perpendicular to the centre front. 

We have to decide where to put our front shoulder dart next. Take half of the bust separation plus 3 cm. Put the zero for your ruler on the centre front seam and slide up, perpendicular to the centre front. When the measurement you took crosses the shoulder line (as seen in the picture) stop and mark this point.


Connect this point to the bust line at the dart you drew earlier. Next measure the dart width along the shoulder line you drew at fist. The dart width is a fixed measurement and depends on your bust size. Someone with a bust size larger than 80 cm and smaller than 90 cm would have to measure 6.5 cm. Someone with a bust size between 90 and 100 would have a dart width of 7,5 cm, for busts over 100 the bust width would be 9.5, for busts of 110cm the width would be 12 and for bust sizes starting from 125cm the bust width will be 15cm. Connect this point to the bust line as well.
T
The next point is the trickiest part of the whole process. You will have to close the dart to get the pattern just right. If you have sewn before this will likely be no real challenge. Fold the right dart line in such a way that it lies directly on top of the left dart line. This becomes considerably easier if you let the majority of the patter hang from a table. Position the dart point (bust point) on the corner of the table and let all of the lines under the bust line hang over the side. When you have folded the pattern successfully (and checked that the sides of the dart do line up correctly) take a ruler and extend the two lines (shoulder and chest line) as shown on the picture. It's not necessary to measure correctly at this point, but you eliminate an extra step by doing so. Check that the shoulder seam is exactly as long as the shoulder measurement. Check that the chest line (between shoulder and bust) is exactly as long as half of the chest measurement.

Put the pattern paper back in place and unfold the dart. You should now have a dart and a pattern piece that is slightly slanted (more or less as shown above). You can double check the measurement for the shoulder and chest by measuring the part right of the dart (the one you constructed first) and adding that to the part you have constructed after that. Connect the three points you have now constructed with a French curve.


It's time for the last construction: the back shoulder dart. Remember how we added one extra cm? We will have to take that away to make the shoulders match op correctly. Why bother doing this? Ever noticed that your shoulders aren't really flat either? They are curves too, and they need the dart to ensure the proper round shape of the arm. Constructing it is easy. First you'll have to extend the dotted line you made before (the one for the back dart) once you have done so, measure 9 cm down from the shoulder along this line. Mark this point. Next measure 0.5 cm left and right of the point where the dotted line crosses the shoulder line. Mark these as well. connect both to the point you marked first. Notice how the dart is asymmetrical? We will have to fix this or our patter wont line up. Measure the length of the left dart leg. (the longest one) make sure the shorter one has the same length (measure and add the necessary line) mark that point. connect this last point to the shoulder tip you created earlier (end of the shoulder on the right).

Congratulations! You have successfully drafted a pattern block! It should look somewhat like this! (Note that I didn't use any real measurements wile making this diagram in paint, and that all sets of measurements differ somewhat so your pattern will look somewhat different, and that is of course the point of a good fit...) You can add some height measurements for skirt lengths if you like (as shown on the right). I like to add mini, knee, and somewhere in between lengths.


Labels: , , , , , , ,