01 02 03 Miss Smartie's Sewing 04 05 15 16 17 18 19 20 21 24 21 24 21 24 21 24 21 24 21 24 25 26 27 28 29

Miss Smartie's Sewing

30 31 32 36 32 36 32 36 32 36 32 36 32 36 37 38 body { background:#aba; margin:0; padding:20px 10px; text-align:center; font:x-small/1.5em "Trebuchet MS",Verdana,Arial,Sans-serif; color:#333; font-size/* */:/**/small; font-size: /**/small; } /* Page Structure ----------------------------------------------- */ /* The images which help create rounded corners depend on the following widths and measurements. If you want to change these measurements, the images will also need to change. */ @media all { #content { width:740px; margin:0 auto; text-align:left; } #main { width:485px; float:left; background:#fff url("https://resources.blogblog.com/blogblog/data/rounders/corners_main_bot.gif") no-repeat left bottom; margin:15px 0 0; padding:0 0 10px; color:#000; font-size:97%; line-height:1.5em; } #main2 { float:left; width:100%; background:url("https://resources.blogblog.com/blogblog/data/rounders/corners_main_top.gif") no-repeat left top; padding:10px 0 0; } #main3 { background:url("https://resources.blogblog.com/blogblog/data/rounders/rails_main.gif") repeat-y; padding:0; } #sidebar { width:240px; float:right; margin:15px 0 0; font-size:97%; line-height:1.5em; } } @media handheld { #content { width:90%; } #main { width:100%; float:none; background:#fff; } #main2 { float:none; background:none; } #main3 { background:none; padding:0; } #sidebar { width:100%; float:none; } } /* Links ----------------------------------------------- */ a:link { color:#258; } a:visited { color:#666; } a:hover { color:#c63; } a img { border-width:0; } /* Blog Header ----------------------------------------------- */ @media all { #header { background:#456 url("https://resources.blogblog.com/blogblog/data/rounders/corners_cap_top.gif") no-repeat left top; margin:0 0 0; padding:8px 0 0; color:#fff; } #header div { background:url("https://resources.blogblog.com/blogblog/data/rounders/corners_cap_bot.gif") no-repeat left bottom; padding:0 15px 8px; } } @media handheld { #header { background:#456; } #header div { background:none; } } #blog-title { margin:0; padding:10px 30px 5px; font-size:200%; line-height:1.2em; } #blog-title a { text-decoration:none; color:#fff; } #description { margin:0; padding:5px 30px 10px; font-size:94%; line-height:1.5em; } /* Posts ----------------------------------------------- */ .date-header { margin:0 28px 0 43px; font-size:85%; line-height:2em; text-transform:uppercase; letter-spacing:.2em; color:#357; } .post { margin:.3em 0 25px; padding:0 13px; border:1px dotted #bbb; border-width:1px 0; } .post-title { margin:0; font-size:135%; line-height:1.5em; background:url("https://resources.blogblog.com/blogblog/data/rounders/icon_arrow.gif") no-repeat 10px .5em; display:block; border:1px dotted #bbb; border-width:0 1px 1px; padding:2px 14px 2px 29px; color:#333; } a.title-link, .post-title strong { text-decoration:none; display:block; } a.title-link:hover { background-color:#ded; color:#000; } .post-body { border:1px dotted #bbb; border-width:0 1px 1px; border-bottom-color:#fff; padding:10px 14px 1px 29px; } html>body .post-body { border-bottom-width:0; } .post p { margin:0 0 .75em; } p.post-footer { background:#ded; margin:0; padding:2px 14px 2px 29px; border:1px dotted #bbb; border-width:1px; border-bottom:1px solid #eee; font-size:100%; line-height:1.5em; color:#666; text-align:right; } html>body p.post-footer { border-bottom-color:transparent; } p.post-footer em { display:block; float:left; text-align:left; font-style:normal; } a.comment-link { /* IE5.0/Win doesn't apply padding to inline elements, so we hide these two declarations from it */ background/* */:/**/url("https://resources.blogblog.com/blogblog/data/rounders/icon_comment.gif") no-repeat 0 45%; padding-left:14px; } html>body a.comment-link { /* Respecified, for IE5/Mac's benefit */ background:url("https://resources.blogblog.com/blogblog/data/rounders/icon_comment.gif") no-repeat 0 45%; padding-left:14px; } .post img { margin:0 0 5px 0; padding:4px; border:1px solid #ccc; } blockquote { margin:.75em 0; border:1px dotted #ccc; border-width:1px 0; padding:5px 15px; color:#666; } .post blockquote p { margin:.5em 0; } /* Comments ----------------------------------------------- */ #comments { margin:-25px 13px 0; border:1px dotted #ccc; border-width:0 1px 1px; padding:20px 0 15px 0; } #comments h4 { margin:0 0 10px; padding:0 14px 2px 29px; border-bottom:1px dotted #ccc; font-size:120%; line-height:1.4em; color:#333; } #comments-block { margin:0 15px 0 9px; } .comment-data { background:url("https://resources.blogblog.com/blogblog/data/rounders/icon_comment.gif") no-repeat 2px .3em; margin:.5em 0; padding:0 0 0 20px; color:#666; } .comment-poster { font-weight:bold; } .comment-body { margin:0 0 1.25em; padding:0 0 0 20px; } .comment-body p { margin:0 0 .5em; } .comment-timestamp { margin:0 0 .5em; padding:0 0 .75em 20px; color:#666; } .comment-timestamp a:link { color:#666; } .deleted-comment { font-style:italic; color:gray; } .paging-control-container { float: right; margin: 0px 6px 0px 0px; font-size: 80%; } .unneeded-paging-control { visibility: hidden; } /* Profile ----------------------------------------------- */ @media all { #profile-container { background:#cdc url("https://resources.blogblog.com/blogblog/data/rounders/corners_prof_bot.gif") no-repeat left bottom; margin:0 0 15px; padding:0 0 10px; color:#345; } #profile-container h2 { background:url("https://resources.blogblog.com/blogblog/data/rounders/corners_prof_top.gif") no-repeat left top; padding:10px 15px .2em; margin:0; border-width:0; font-size:115%; line-height:1.5em; color:#234; } } @media handheld { #profile-container { background:#cdc; } #profile-container h2 { background:none; } } .profile-datablock { margin:0 15px .5em; border-top:1px dotted #aba; padding-top:8px; } .profile-img {display:inline;} .profile-img img { float:left; margin:0 10px 5px 0; border:4px solid #fff; } .profile-data strong { display:block; } #profile-container p { margin:0 15px .5em; } #profile-container .profile-textblock { clear:left; } #profile-container a { color:#258; } .profile-link a { background:url("https://resources.blogblog.com/blogblog/data/rounders/icon_profile.gif") no-repeat 0 .1em; padding-left:15px; font-weight:bold; } ul.profile-datablock { list-style-type:none; } /* Sidebar Boxes ----------------------------------------------- */ @media all { .box { background:#fff url("https://resources.blogblog.com/blogblog/data/rounders/corners_side_top.gif") no-repeat left top; margin:0 0 15px; padding:10px 0 0; color:#666; } .box2 { background:url("https://resources.blogblog.com/blogblog/data/rounders/corners_side_bot.gif") no-repeat left bottom; padding:0 13px 8px; } } @media handheld { .box { background:#fff; } .box2 { background:none; } } .sidebar-title { margin:0; padding:0 0 .2em; border-bottom:1px dotted #9b9; font-size:115%; line-height:1.5em; color:#333; } .box ul { margin:.5em 0 1.25em; padding:0 0px; list-style:none; } .box ul li { background:url("https://resources.blogblog.com/blogblog/data/rounders/icon_arrow_sm.gif") no-repeat 2px .25em; margin:0; padding:0 0 3px 16px; margin-bottom:3px; border-bottom:1px dotted #eee; line-height:1.4em; } .box p { margin:0 0 .6em; } /* Footer ----------------------------------------------- */ #footer { clear:both; margin:0; padding:15px 0 0; } @media all { #footer div { background:#456 url("https://resources.blogblog.com/blogblog/data/rounders/corners_cap_top.gif") no-repeat left top; padding:8px 0 0; color:#fff; } #footer div div { background:url("https://resources.blogblog.com/blogblog/data/rounders/corners_cap_bot.gif") no-repeat left bottom; padding:0 15px 8px; } } @media handheld { #footer div { background:#456; } #footer div div { background:none; } } #footer hr {display:none;} #footer p {margin:0;} #footer a {color:#fff;} /* Feeds ----------------------------------------------- */ #blogfeeds { } #postfeeds { padding:0 15px 0; }

Sunday, 8 March 2015

Owlsome Summer Dress


 The project I've blogged about last week has been finished. I couldn't wait to wear this dress, so I had to sew obsessively until it was done. I had the chance today to wear it out at the zoo, since it was a freakishly warm and sunny winters day, I bullied my boyfriend to take pictures for me and here we are! It really felt like spring and I loved it! This dress has everything you would want in a fantastic summers dress, It's cute (owls), practical (pockets!), flattering and swirls around very nicely. The skirt would be perfect for a rock and roll dancing or a pick nick. The bodice is really deeply cut, but the gathered cups keep everything nice and modest.

This summer dress has a circle skirt and contrasting halter straps. The bodice is close fitting and features some gathers witch will make your breasts seam larger when they are small like mine.
I love the contrasting fabrics on the halter piece but I have been putting of the decision witch contrast fabric to use. In the end I went for a leftover fabric I already had in my stash and made my own owl decorations as you can read in my post on customising fabric. I felt that the contrast was not used enough witch left the design unbalanced, so I added another part in that fabric.

Since I'm already boasting about my fabric customisation, I LOVE my owl fabric. I think It really makes the dress more festive and fit for summer. (and It's not even spring here yet). I'm very happy with how this turned out. I was really afraid that it would look sloppy or very irregular. Instead the owls all get a unique character and I could strategically place my designs to make pattern matching easier. Or at least in theory. I ended up miscalculating a couple of times, but I still think It looks nice and anyway, hand painting your fabric makes you think twice about re cutting pieces.


I also love the design witch I think really suits my figure. It enhances both my hips and breasts and emphasises my waist. Since I'm a bit of a rectangle, I'm always grateful for clothes that make me look as if I've got real curves.  I did not have to make any pattern alterations for fit but I did end up overlapping the halter pieces several cm. I might have made them slightly to tight but this stopped the bodice from gaping and helped with modesty coverage. This is probably down to my relatively small breasts.

Oh and a plus for pockets!

dress inside out, click to enlarge
I also love the finished look the lined bodice has. I use a lot of facings and they never give such a clean finish. It involves a bit of extra work and a lot of extra fabric. But I think the result is worth it. To match this clean finish I tried out hong kong seams and a hong kong hem. I made some biasband from my contrast fabic for the seams and just sewed that on instead of zigzagging the whole piece. Sewing the seam together after went like a breeze. I really liked the finished look and I thought the amount of extra work was reasonable.
I did not have such a fine experience with the hong kong hem though. The pattern calles for a narrow hem of 1.5 cm and I already shortened my dress quite a bit. I did not want it to get much shorter. I cut out more than 3m of bias strips (with a width of 2.5 cm) and sewed them together. Then I sewed it to the hemline. Then I had to turn the strip in twice and turn the hem up 1 cm. This was very fidley work and turned out very time consuming. I also have the feeling that I did something wrong since the hem doesn't seam to flow properly. The result does look nice on the inside though. I'm going to try it with wider strips on a wider hem next time to asses whether this technique is always as tiresome.

If you are thinking of making this dress yourself beware of the pattern label. It's marked easy but some of the techniques are more for the experienced sewer and are not explained at all in the instructions. I'm talking about inserting the bodice into the halter pieces. This has to be done really neatly to give the dress a crisp finish. All other parts of the process are explained adequately though. If you are really determined there are always lots of amazing you tube technique video's to take you through the process...

I also spotted some missing pattern marks (or I might have overlooked them) on the back seam of the skirt. nothing too important though. The notch in the pocket is also in the wrong place according to me, just align the top of the pocket with the top of the skirt like in the picture and you should be fine though.

To sum things up:

I'm in love with the result. I learnt new techniques (although I broke two needles in the process). I have owls on my dress. I made a matching hair bow. In short this was a good experience. The pattern comes together fine and if you are willing to dare the rather advanced process of sewing in contrasting pieces, this dress is for you. Just be prepared to give it a couple of tries. The fabric pieces will mould together in the end. The result is certainly worth the trouble. I'm really in love with this dress at the moment and I would love to have another, I might make another view but I have agreed on sewing a large number of dresses for other people in the near future though so there will be next to no sewing for myself until June.


Labels: , , ,

Thursday, 5 March 2015

The Little Tucked Dress

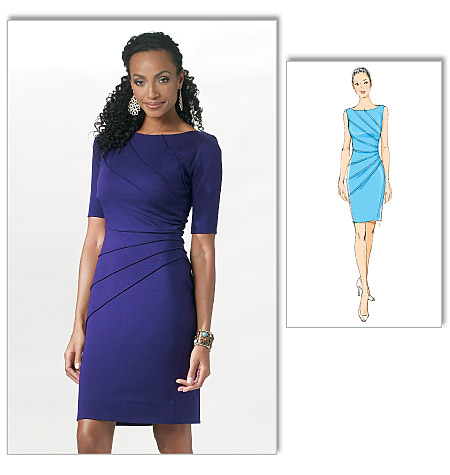
A while ago I was looking for patterns that would suit my figure. I usually look good in clothes that fit tightly since I'm so thin, but on the other hand, tight clothes sometimes make me look like I haven't got any curves. Not this pattern. Oh no.

I was looking through sewing pattern review when I noticed it, an intriguing, simple stile, made up by lots of different people but always with amazing results. hugging the right places and drawing the eye in a very flattering way, on everyone. the look is also casual enough for work, or just about anything, but still so sexy that you will definitely turn some heads. It can be dressed up or down with accessories to your liking. It's like a little tucked dress, everyone should have one!

Ok, enough raving enthusiasm. The pattern I'm talking about is Butterick 5559. Its a close fitting dress made out of a strech fabric of your liking. It has some very nice sunburst pleats that make the look stand out. The lines of the dress are really simplistic, a swallow boat neck and the option for a sleeved or sleeveless version.

since the design features such prominent tucks I was  a bit nervous about doing them. I had never done anything like that before. Previous reviews told me to take especial care while marking the lines. sewing them turned out to be surprisingly simple. I marked all lines with carbon paper and transferred the lines with pins to the good side of the fabric. Matching up the pins meant matching up the lines. then it was just a matter of carefully sewing down every tuck. I didn't need any additional explanations besides what was already in the pattern, so that's a surprising change. I sewed the whole dress in little over a day, cutting included so this dress came together fabulously easy for me. the hardest part was definitely getting the tucks to line up in the side seam. It took some tries especially for the waist tuck, but I finally got it almost right. Good enough for me :)

I used a stretch knit for this project. It has a weird kind of creases in it, witch I don't really like and feels velvety on one side. It's very comfortable and warm and hides all imperfections. It was a lucky find on a discount shelve so I have no idea what kind of fabric it actually is.

I didn't have to make a single adjustment for this pattern. No need to change perfection, wouldn't have known how to deal with changing the tucks and darts on this one anyway ;). Well actually I might have tampered with the hem length. In the end I just left my dress unhemmed, but I can't remember whether I had planned to shorten it or not.

To conclude:
This pattern seems to never disappoint. It was easy to make and the result is pretty nice. It's a shame that the pattern has been discontinued recently. If you get the chance to grab your own, do so you won't regret it.
Personally I would already love to have a second version in a more neutral colour, maybe gray. It feels super comfortable on and I have gotten lots of compliments with this dress. It's really not such a complicated design as it appears to be.
And the design is just perfect, I love the tucks as they give the dress a very distinguished look. I'd also seen lots of reviews of this pattern and every single dress looked stunning. Also I love the hidden darts. It felt like cheating hiding them in the tucks. Dresses like this are generally flattering for my figure but this dress has a huge wow factor. It somehow enhances everything that needs to be enhanced and magically looks awesome on everyone!

Some more pictures:


Labels: ,

Sunday, 1 February 2015

A Cat for Company

I fell in love with this pattern a while ago while going through Mccalls patterns. The expression on this cat's face made me smile and I knew I had to buy it then. The cat on this cover really caught my eye in the original pattern, it's so cute and looks so bewildered sitting there amid the mess of bobbins she presumably caused, looking all innocent and cat like. The cover also features some cute piping in the seams. Other than that it's just a useful (and pretty) item for your sewing room.


It sat around for a very long time before I got round to making this one. Mostly because I rarely make crafts and I was a bit nervous about it. But also because assembling the perfect materials took a very long time. I've ended up using a lot of scraps that I've had laying around for ages. Most of them leftovers of dresses I've made in the past or pieces I know will be left over of dresses I'm going to make. I used a lot of old mismatched buttons but I also couldn't resist all the nice and shiny buttons in the store, so I ended up having waaay to many of them. My favourite item for this project however heavy duty cord for the piping I had to find, something I never dreamed I would be purchasing for sewing purposes. And couldn't find in any of my regular sewing supply shops. I ended up buying them at a building store witch got me some funny looks.

If you plan on making this pattern you will probably have to adjust the pattern to the size of your own machine. It's not pretty hard though, but maybe a bit challenging for a beginner since the pattern doesn't explain how this can be done at all. The instructions to this project are fine, but not very elaborate, (but seeing the project isn't that complex that's not a bad thing). It did explain the piping and how to apply the appliqués briefly. Having the sewing lines on the pattern pieces was pretty practical while adjusting the 'fit' of the cover so I liked that.


I added a couple of extra buttons because I they were all so cute and I did some more hand sewing to make it look as if the bobbins are a bit unwound. I've made no other changes except to make my sewing machine fit. I really love how to looks very unique and typically me. I've always been a cat person but I really like my new companion. I've even got one or two people in mind to sew this for as a present but it would turn out as totally different looking projects than mine I think.

I've also noticed that the cover is reversible. It looks pretty acceptable inside out as you can see on my picture. I definitely consider this a plus too.

As a whole, I'm very happy with my new addition to the sewing room. It will take care of my machine and make sure it doesn't get dusty. It also looks a lot nicer than the plastic cover I used to have and never used because of it's appalling ugliness. I really like how it brightens up my sewing room and I think it will be a great inspiration for projects to come.

Labels: ,

Friday, 4 April 2014

Past projects part 3: the dinosaur dress

I picked up this cute and amazing fabric over a year ago on the fabric fair. It features cute dinosaurs in all colours and shapes. Soon after arriving home I realised that the pattern I planned doing in it would not do at all. It had lots of pleats and I loved the fabric to much to let that happen. Since I originally planed to do a sheath dress in this I didn't purchase a lot of fabric.

Butterick 5603 pattern illustration
I went looking for a pattern with big panels wherethe small and very busy print  wouldn't be overcrowding and I would be able to  make the dinosaurs shine. After surfing the Internet, my eye fell on Butterick 5603. A pattern I've seen incarnated a lot both in stylishly retro fashion and with awesome novelty prints. It were these projects that convinced me because the butterick version looks slightly horrendous. I realised I needed that pattern. Now!! So I bought it as my first PDF printable pattern, since I did not know where I would be able to pick up Butterick patterns here in Belgium.

That turned out to be a mistake. I found the printing facilities a bit weird. (you only get to print it 3 times ever in the same year you purchased it) this got me all worked up and worried since I tried to print it on my laptop, realised I had selected the wrong printer and ended up almost immediately ruining the times I could print. Eventually it worked, and I might just purchase a pattern like that again if I'm really in a hurry.

Taping up all of the pattern pieces isn't that difficult, but it takes some extra time. I'm pretty conflicted about printed patterns since they are usually on normal (stiff) paper. this makes them more durable, but can be anoying when you want to store (the original) pattern pieces away. I spend all of my allotted sewing time preparing the pattern and lost interest in it for a whole while, due to school and real live stuff.

After being on my to do list for more than a year I decided to start work on the dress again. In the middle of my exams, witch is usually the time when I get all sewing obsessed and start watching you tube technique videos. I started doodling design options for the dress. I quickly worked out that I did not want to make the dress plainly as it was, and I feared I didn't have enough of the Dino fabric to make a full skirt as it was anyway. (The first pattern I planned on making had a pencil skirt.)

I put together some of my stash fabrics with the Dino fabric and really liked how a bright green went with the Dino's. I paired this with a slightly stretchy black I had lying around for ages. I thought that it would look good to have some design accents in green and maybe some panels in black because the dress would otherwise look to crowded. I decided I wanted black side panels and I wanted them to continue into the bodice of the dress. The only problem was that the dress there are only six panels in the original dress and the bodice is made up out of one piece. I daringly set out to make my first design related pattern adjustments on an existing pattern.

I ended up drawing my own wide dramatic collar and added a wide strip of green to the hem of the dress to balance this out. I split up the side panels into halves at the darts in the front and the same distance in the back. One part would be black the other Dino! I had to redraw the font and back bodice pieces. The back was pretty easy. I just marked the line I wanted and cut it off. I then added seam allowance and notches. The front was a little bit more difficult. I had  decided on a princess seam and if possible I wanted to eliminate the front bodice gathers, so they would not disturb my dinosaurs. I drew the design line I wanted and then added 2 cm extra ease to the curve in the side. This made shure the dress would curve nicely. I walked the distance of the seam multiple times to make sure the fit would be correct. It all turned out pretty well, but I think I overdid the ease since the bodice fits a bit loosley.

I did do a muslin for this project, but nothing much surprising happened so I happily started sewing. The design lines didn't allign perfectly, but I thought I would be able to fix that later on in the real thing. A dangerous assumption.

While constructing the garment I realised the dino fabric was to sheer and would be see through. I added the green fabric as interfacing. this looked awesome and neat on the table, but the combined stiffness of these fabrics really made my dress a tad wild and poofy.

I used (my first) french seams on the seams in the skirt and lined the bodice. I added some bias band to the hem, but this added even more stiffness and made the dress look a bit weird. after wearing it a wile it the skirt usually settles down a bit so I decided to leave it as it was.

I love the inside of the dress.
Those polkadots and french seams always make me smile.
It was also my first time trying to match up a novelty fabric. I read about it on the Internet and decided to try to match the horizontal seams. I apparently did something wrong there, I think I didn't take the seam allowance of the seams on the sides into account. the dress ended up looking good, so I didn't really mind. Didn't have enough fabric for a second try either.

The most difficult part of the construction was the matching up of the horizontal seam between bodice and skirt. I ended up shifting the fabric around quite a bit. I had to take in some fabric in the black part of the dress, witch was unfortunate because it nearly eliminated all of the wearing ease I needed there, but fortunate since the black fabric turned out to be stretchy enough to accommodate movement and even a lot of eating.

In the end I'm really proud of this dress. I learnt tons of new techniques like french seams and tried out others like matching novelty fabrics at the seams. I used my first printable pattern and my first pattern with seam allowance included. (I can tell you what a revelation!!). I feel like I've learnt ton's (also first time to use interfacing, and invisible zip, purchased bias band) and I cannot wait to learn more.

I went to the (Antwerp) Zoo yesterday and my boyfriend took these absolutly adorable pictures. Thank you so much!


Labels: , , , ,

Tuesday, 1 April 2014

The Joan dress


It's finished!! I did a crazy day of deadline sewing today and made the dress all in one go. Unfortunately that did not leave a lot of room for tweaking and unpicking for better adjustments. I'm so happy with my dress! To bad it's nighttime now and I cannot make awesome sunlit pictures in the garden.


I think the dress turned out fairly all right. It's the first woven fabric pattern I made from scratch and it's totally wearable! I can move! hurray! I really like the sunburst pleating I did in the back in hindsight and I love how the collar turned out. I did three muslins to get it that close so I'll stick with this result. The only thing I don't like all that much are the sleeves, I didn't really plan them to come out this way, and they don't fit 100 procent right. There is too much room on top and to little at the bottom. No idea weather this is because of the pattern or the sloper I made. I'll try to tweak them later on. I also added an extra belt. I felt that the waistband of the dress was not giving enough definition on it's own. Probably because I'm not Christina Hendricks. Too bad...

Full details on how I made this pattern and a tutorial to make your own can be found here construction drawing and design choises and here how to adjust a sloper to this pattern.

I love the fabric, it may be a bit bleak but it has a really nice texture and drape to it. I went looking for a fabric that looked warm and coat like but was fit to be worn as a dress. This was rather difficult since they mainly had summer fabrics at the fabric fair when I went and bought the fabric. I chose a natural looking green becouse it's still close in spirit to the rusty brown of the original dress but suits my wardrobe better. remains in the  I thought it would be hellishly difficult to sew since it was very slippery while cutting out the pieces but it came out alright. The real dealbraker today was the tread, it kept on breaking without any apparent reason!

I styled the dress with an awesome swarovski spider pin from my mom. The stone fell out just before the photo (nothing unfixable however), but I think it still looks nice. And red boots because red shoes are awesome.

The dress features French seams where possible and bias binding where it was not. The hem is finished with a blind hem machine stich.


Labels: , , , ,

Saturday, 15 March 2014

Past projects part 2: the pretty petticoat


My best friend is crazy about the 50'ies and she has wanted a petticoat for years. A while back we got adventurous and decided to make one of our own. We went and bought 8 m of tulle and some satin (I think 1.5 m for the both of us). In the end I would recommend more fabric for the lining, since we ran a bit short (my bad for forgetting the wearing ease mostley). We chose a bright neon green since we really were feeling adventurous, and I do like the way it turned out. It's pretty lively and looks pretty peeking out of your dress.

I had been searching the web for the perfect petticoat pattern for ages and hadn't found anything that I really liked, so I made the pattern for this petticoat myself with tips and tricks I picked up from loads of other tutorials. Drafting this pattern isn't difficult at all, but since there are so many options it can get confusing.

I do love the possibility's of petticoats, especially for bridal and evening wear. You can really make any shape you like to enhance the shap you have. I think I might like a mermaid one as well, one day. I do recommend tackling this project with two people since that really came in handy while cutting the fabric. We ended up spending  a day on the cutting alone. But in the end, it's quit cheap to make, compared to a purchased one. I think we spend 6 euro on the tulle and 3 on the satin (per person) and 3 for thread, and yes you will need a lot of that. Compared to prices asked for petticoats in stores, that's saving bundles.

The construction turned out to be slightly trickier than I antisipated. But it's still fairley straightforward if you've ever used a sewing machine before. It does involve lots of gathering and pinning and that can be a bit tricky if you've never done that before. If you are teaming up for this project it's easiest to have one person pin and the other person gathering. The last reason why I would recommend teaming up for this particular project is that gathering and pinning yards and yards of fabric can get a little boring without propper company.

The Petticoat underneath a dress. 

Since we only had limited time to finish this project it got a little stressy resulting in me making a lot of beginners mistakes that only slowed the proces down even more. I for example forgot the wearing ease while cutting out the inner skirt. I ended up having to insert a strip of fabric, since the leftovers weren't large enough for a new piece.
I also should have used two different pieces of fabric for the waistband and the lining since now the good side of the lining is facing inwards, but since the petticoat is see through it looks a bit weird.
I regret not making the lining in a stretchier fabric that would make walking a tad easier.
I ironed the lining separately since you cannot iron tulle (it will melt). This gave me the crisp crease I wanted in the hem and the waistband.

Conclusion: I'm really happy with how this project turned out. the petticoat is very versatile and cheap compared to a bought one. It did take quite some time to make but I feel it was totally worth it. Although I made some mistakes in the pattern, I've got a good idea how i'll fix them next time around. Since It's an undergarment no-one will notice anyway so I cant be botherd unpicking it all.

I will make an in depth tutorial on how to make this or any other petticoat in my next post.


Labels: , , ,