01 02 03 Miss Smartie's Sewing 04 05 15 16 17 18 19 20 21 24 21 24 21 24 21 24 21 24 21 24 21 24 21 24 25 26 27 28 29

Miss Smartie's Sewing

30 31 32 36 32 36 32 36 32 36 32 36 32 36 32 36 32 36 37 38 body { background:#aba; margin:0; padding:20px 10px; text-align:center; font:x-small/1.5em "Trebuchet MS",Verdana,Arial,Sans-serif; color:#333; font-size/* */:/**/small; font-size: /**/small; } /* Page Structure ----------------------------------------------- */ /* The images which help create rounded corners depend on the following widths and measurements. If you want to change these measurements, the images will also need to change. */ @media all { #content { width:740px; margin:0 auto; text-align:left; } #main { width:485px; float:left; background:#fff url("https://resources.blogblog.com/blogblog/data/rounders/corners_main_bot.gif") no-repeat left bottom; margin:15px 0 0; padding:0 0 10px; color:#000; font-size:97%; line-height:1.5em; } #main2 { float:left; width:100%; background:url("https://resources.blogblog.com/blogblog/data/rounders/corners_main_top.gif") no-repeat left top; padding:10px 0 0; } #main3 { background:url("https://resources.blogblog.com/blogblog/data/rounders/rails_main.gif") repeat-y; padding:0; } #sidebar { width:240px; float:right; margin:15px 0 0; font-size:97%; line-height:1.5em; } } @media handheld { #content { width:90%; } #main { width:100%; float:none; background:#fff; } #main2 { float:none; background:none; } #main3 { background:none; padding:0; } #sidebar { width:100%; float:none; } } /* Links ----------------------------------------------- */ a:link { color:#258; } a:visited { color:#666; } a:hover { color:#c63; } a img { border-width:0; } /* Blog Header ----------------------------------------------- */ @media all { #header { background:#456 url("https://resources.blogblog.com/blogblog/data/rounders/corners_cap_top.gif") no-repeat left top; margin:0 0 0; padding:8px 0 0; color:#fff; } #header div { background:url("https://resources.blogblog.com/blogblog/data/rounders/corners_cap_bot.gif") no-repeat left bottom; padding:0 15px 8px; } } @media handheld { #header { background:#456; } #header div { background:none; } } #blog-title { margin:0; padding:10px 30px 5px; font-size:200%; line-height:1.2em; } #blog-title a { text-decoration:none; color:#fff; } #description { margin:0; padding:5px 30px 10px; font-size:94%; line-height:1.5em; } /* Posts ----------------------------------------------- */ .date-header { margin:0 28px 0 43px; font-size:85%; line-height:2em; text-transform:uppercase; letter-spacing:.2em; color:#357; } .post { margin:.3em 0 25px; padding:0 13px; border:1px dotted #bbb; border-width:1px 0; } .post-title { margin:0; font-size:135%; line-height:1.5em; background:url("https://resources.blogblog.com/blogblog/data/rounders/icon_arrow.gif") no-repeat 10px .5em; display:block; border:1px dotted #bbb; border-width:0 1px 1px; padding:2px 14px 2px 29px; color:#333; } a.title-link, .post-title strong { text-decoration:none; display:block; } a.title-link:hover { background-color:#ded; color:#000; } .post-body { border:1px dotted #bbb; border-width:0 1px 1px; border-bottom-color:#fff; padding:10px 14px 1px 29px; } html>body .post-body { border-bottom-width:0; } .post p { margin:0 0 .75em; } p.post-footer { background:#ded; margin:0; padding:2px 14px 2px 29px; border:1px dotted #bbb; border-width:1px; border-bottom:1px solid #eee; font-size:100%; line-height:1.5em; color:#666; text-align:right; } html>body p.post-footer { border-bottom-color:transparent; } p.post-footer em { display:block; float:left; text-align:left; font-style:normal; } a.comment-link { /* IE5.0/Win doesn't apply padding to inline elements, so we hide these two declarations from it */ background/* */:/**/url("https://resources.blogblog.com/blogblog/data/rounders/icon_comment.gif") no-repeat 0 45%; padding-left:14px; } html>body a.comment-link { /* Respecified, for IE5/Mac's benefit */ background:url("https://resources.blogblog.com/blogblog/data/rounders/icon_comment.gif") no-repeat 0 45%; padding-left:14px; } .post img { margin:0 0 5px 0; padding:4px; border:1px solid #ccc; } blockquote { margin:.75em 0; border:1px dotted #ccc; border-width:1px 0; padding:5px 15px; color:#666; } .post blockquote p { margin:.5em 0; } /* Comments ----------------------------------------------- */ #comments { margin:-25px 13px 0; border:1px dotted #ccc; border-width:0 1px 1px; padding:20px 0 15px 0; } #comments h4 { margin:0 0 10px; padding:0 14px 2px 29px; border-bottom:1px dotted #ccc; font-size:120%; line-height:1.4em; color:#333; } #comments-block { margin:0 15px 0 9px; } .comment-data { background:url("https://resources.blogblog.com/blogblog/data/rounders/icon_comment.gif") no-repeat 2px .3em; margin:.5em 0; padding:0 0 0 20px; color:#666; } .comment-poster { font-weight:bold; } .comment-body { margin:0 0 1.25em; padding:0 0 0 20px; } .comment-body p { margin:0 0 .5em; } .comment-timestamp { margin:0 0 .5em; padding:0 0 .75em 20px; color:#666; } .comment-timestamp a:link { color:#666; } .deleted-comment { font-style:italic; color:gray; } .paging-control-container { float: right; margin: 0px 6px 0px 0px; font-size: 80%; } .unneeded-paging-control { visibility: hidden; } /* Profile ----------------------------------------------- */ @media all { #profile-container { background:#cdc url("https://resources.blogblog.com/blogblog/data/rounders/corners_prof_bot.gif") no-repeat left bottom; margin:0 0 15px; padding:0 0 10px; color:#345; } #profile-container h2 { background:url("https://resources.blogblog.com/blogblog/data/rounders/corners_prof_top.gif") no-repeat left top; padding:10px 15px .2em; margin:0; border-width:0; font-size:115%; line-height:1.5em; color:#234; } } @media handheld { #profile-container { background:#cdc; } #profile-container h2 { background:none; } } .profile-datablock { margin:0 15px .5em; border-top:1px dotted #aba; padding-top:8px; } .profile-img {display:inline;} .profile-img img { float:left; margin:0 10px 5px 0; border:4px solid #fff; } .profile-data strong { display:block; } #profile-container p { margin:0 15px .5em; } #profile-container .profile-textblock { clear:left; } #profile-container a { color:#258; } .profile-link a { background:url("https://resources.blogblog.com/blogblog/data/rounders/icon_profile.gif") no-repeat 0 .1em; padding-left:15px; font-weight:bold; } ul.profile-datablock { list-style-type:none; } /* Sidebar Boxes ----------------------------------------------- */ @media all { .box { background:#fff url("https://resources.blogblog.com/blogblog/data/rounders/corners_side_top.gif") no-repeat left top; margin:0 0 15px; padding:10px 0 0; color:#666; } .box2 { background:url("https://resources.blogblog.com/blogblog/data/rounders/corners_side_bot.gif") no-repeat left bottom; padding:0 13px 8px; } } @media handheld { .box { background:#fff; } .box2 { background:none; } } .sidebar-title { margin:0; padding:0 0 .2em; border-bottom:1px dotted #9b9; font-size:115%; line-height:1.5em; color:#333; } .box ul { margin:.5em 0 1.25em; padding:0 0px; list-style:none; } .box ul li { background:url("https://resources.blogblog.com/blogblog/data/rounders/icon_arrow_sm.gif") no-repeat 2px .25em; margin:0; padding:0 0 3px 16px; margin-bottom:3px; border-bottom:1px dotted #eee; line-height:1.4em; } .box p { margin:0 0 .6em; } /* Footer ----------------------------------------------- */ #footer { clear:both; margin:0; padding:15px 0 0; } @media all { #footer div { background:#456 url("https://resources.blogblog.com/blogblog/data/rounders/corners_cap_top.gif") no-repeat left top; padding:8px 0 0; color:#fff; } #footer div div { background:url("https://resources.blogblog.com/blogblog/data/rounders/corners_cap_bot.gif") no-repeat left bottom; padding:0 15px 8px; } } @media handheld { #footer div { background:#456; } #footer div div { background:none; } } #footer hr {display:none;} #footer p {margin:0;} #footer a {color:#fff;} /* Feeds ----------------------------------------------- */ #blogfeeds { } #postfeeds { padding:0 15px 0; }

Sunday 5 February 2017

Winkelwijs: stof kiezen

Als je nog niet lang naait kan het erg overweldigend zijn om naar de winkel te stappen en stof te kopen. Hoe weet ik dat ik geen miskoop doe? Waar moet ik op letten in de winkel?


Hoe weet ik wat ik wil?
Voor je stof gaat kopen moet je je een aantal dingen afvragen over welke eigenschappen je stof moet hebben voor het project dat je voor ogen hebt (soms loopt dit ook andersom en spreekt een stof je zo aan dat je meteen vijf projecten kan bedenken waarvoor je DEZE stof NU nodig hebt, blijf rustig, dit is normaal, geef gewoon toe en begin je eigen stoffenbibliotheek).

Zorg ervoor dat je voor je stof gaat kopen kan antwoorden op de volgende vragen:

stijve, medium zware stof
soepele, lichte stof


Moet mijn stof stijf of soepel zijn voor wat ik wil bereiken?
Wil ik een dunne of een zware stof?
Vraagt het patroon dat ik wil gebruiken om rekbare stof?
Wil ik een kreukvrije stof (synthetisch) of een waar je makkelijker mee werkt (natuurlijke vezels)?

Deze vragen zijn essentieel voor hoe je project er zal uitzien, als je weinig ervaring hebt kan het helpen om eens aan een gelijkaardig kledingstuk dat je al hebt te gaan voelen, je wil dat de stof voor jou project ongeveer dezelfde eigenschappen heeft. Op de stoffenbeurs of in de stoffenwinkel is het ok om aan de stof te voelen, maak een stukje stof los van de rol en drapeer het even in de lucht, controleer of de stof rekbaar, licht zwaar, doorschijnend of kreukvrij is...


Wil ik een drukke print of liever iets effen?
Wil ik een felle kleur of een neutrale kleur die ik gemakkelijk kan combineren?

Hoe verleidelijk het ook is om naar de mooiste, leukste, schattigste stofjes te grijpen (zijn we niet allemaal een beetje eksters). Denk altijd eerst na hoe de stof in jou kleerkast zal passen. Kan je de kleur gemakkelijk combineren? Wil je er echt uitzien als een wandelende kerstboom? Kies vooral waar jij je je goed in voelt, je hebt de kans om nu eens echt te maken wat jij wil. Soms kan het ook een uitdaging zijn om eens echt na te denken over wat er bij jou huidige levensstijl en kleerkast past en jezelf te beperken tot bepaalde kleuren of silhouetten. Maar dat is een onderwerp op zich.

Hoeveel stof heb ik nodig?

Hier accuraat op kunnen antwoorden kan je veel geld besparen. Hou er wel rekening mee dat je voor sommige stoffen met patronen met een duidelijke boven en onderkant meer stof zal nodig hebben dan er bij de stofsuggesties van je patroon wordt aangeraden.

Friday 20 January 2017

Hoe herken je een vintage jurk (of kwaliteit retro)

In een vintage jurk vinden we vaak een aantal specifieke elementen terug die de jurk het gewenste silhouet geven. Deze technieken zijn gebruikt met als doel de jurk meer stabiliteit te geven en draagbaarder te maken maar bepalen ook de vorm van het kledingstuk.Dit maakt oude jurken vaak van betere kwaliteit, natuurlijk kan je het ook gewoon allemaal zelf doen.

stevig katoen als basislaag met polyester balleinen als tunnel voor sterkere plastieken balleinen.
1. Stevige katoenen interfacing of voering
Een tussenlaag of voering laag van katoen wordt soms gebruikt om meer structuur te geven aan een dunne soms doorschijnende stof. Niet alleen wil je natuurlijk niet dat iedereen kan zien welke kleur ondergoed je aanhebt onder je jurk, de stof zorgt er ook voor dat de wijde rok vanzelf meer volume krijgt. Bovendien kan het nauw aansluitend lijfje nu ook echt dienstdoen als stevige onderkleding.
2. Balleinen
Alle jurken zonder mouwen werden vroeger gemaakt met een vorm van balleinen. Dit zorgt ervoor dat de jurk op zijn plaats blijft als je beweegt en niet afzakt of ronddraait. Het is belangrijk dat de jurk zelf wel ruim genoeg is om te blijven bewegen maar de balleinen zorgen ervoor dat alles netjes op zijn plaats blijft.

tailleband (foto sewaholic)
3. Tailleband
Deze extra interne riem zit strak rond je taille. Je verankert de jurk op je taille zodat de structuur van onderaf gedragen wordt en niet afzakt of zo strak zit dat je helemaal platgedrukt wordt.
Stiekem vleugje kleur 
4. (Losse) petticoat
Het wespentaille silouhet van de jaren 50 wordt vooral gemaakt door het sterke contrast van de nauwsluitende lijfjes met de sculpturale rokken. Door een onderrok van tulle te dragen wek je de illusie van volume en een kleurrijke petticoat zorgt voor een leuk extra origineel kantje aan je outfit

5. Geen blinde rits
Ik ben een enorme fan van blinde ritsen, ze zijn erg onopvallend en geven de mooiste afwerking aan je kledingstuk. Spijtig genoeg zijn ze niet erg sterk en niet bedoeld om veel kracht op te vangen. Als je lijfje erg strak zit kan een blinde rits splijten (en het laatste wat je wil is letterlijk uit je kleren barstten). Dat wil niet noodzakelijk zeggen dat je jurk niet past, de rits was gewoon niet gemaakt om zo'n dramatisch silouhet te ondersteunen.

6. Extra laagjes waar nodig
Als je geen of aangepast ondergoed moet dragen onder een jurk is het belangrijk om de juiste ondersteuning te voorzien. Een dunne laag stof waaronder alles zichtbaar is is misschien niet zo naar je zin. Hier gebruik ik stevige katoen en een dunne fleece om een gevulde cup te maken waar ik mezelf comfortabel in kan blijven voelen zelfs met aangepast ondergoed.

7. De juiste print
Een retro kleedje is pas helemaal af als het een leuke print heeft. Laat je helemaal gaan met bolletjes, streepjes, fruit of schattige dieren of combineer met contrasterende kleuren voor de details.

Labels: , , , ,

Saturday 14 January 2017

Dressing the decade: The 50s - The Shelf bust dress

Wie houd van een beetje retro-glamour is waarschijnlijk wel bekend met de glamoureuze cirkelrokken en de smalle tailles van de jaren '50. Dit typische silhouet ontstond als reactie op de praktische vrouwenmode uit de jaren '40 vrouwen kozen ervoor om hun vormen te benadrukken en vaak te overdrijven. Dat gebeurde dan ook met behulp van de juiste onderkleding. De modellen uit deze periode hebben niet allemaal de perfecte wespentaille die ze lijken te hebben: ze dragen een corselette van stugge stof om hun buik plat te houden en een petticoat van crinoline die de volle rokken bol deed staan, wat de heupen accentueert en verbreed.

Een trend die bij deze mode paste is de shelfbust wat losvertaald de uitstalrekjurk of platter de schabjurk zou kunnen worden. Zoals de naam suggereerd is deze jurk bedoeld om de vrouwelijke vormen uit te stallen. Dit gebeurd door plooien of volumineuze stof in de borststreek in contrast met een lijfje dat onder de borst nauwsluitend is. Om van een echte 'shelf bust' te spreken moet er onder de borst een soort van decoratie zitten die de borst lijkt te ondersteunen en omkadert. Dit trekt niet alleen de aandacht maar suggereert ook volume. De trent heeft maar relatief kort bestaan in de bloeiperiode van het decennium, maar we kunnen er toch wel veel sporen van terugvinden.

Hierboven zien we een naaipatroon uit 1945 en het stijlicoon Elisabeth Taylor in een heel gelijkaardige jurk. Hieronderonder vind je nog enkele voorbeelden van jurken uit de periode, de ene al wat extravaganter dan de ander.


Wie deze look ook eens wil uitproberen kan zijn eigen versie maken met de hulp van Butterick 5882 (links) of Simplicity 1155 (rechts).


Ikzelf heb het butterick patroon gebruikt voor mijn versie van deze look. Wat je wel nog moet weten: de moderne patronen vergroten de borsten niet zo zeer als de originele stijl uit de 50ies. De naad die de onderkant van de borst moet volgen loopt bij deze twee patronen over het midden van de borst, wat hem net kleiner doet uitkomen. Voor de welvoorziene dames onder ons is dat misschien prettig want de jurk is zo uitermate geschikt om de aandacht te trekken maar zal er niet vulgair of ongepast uitzien. Wie iets meer borst wil suggereren kan het patroon best aanpassen zodat de naad van het bovenstuk lager komt de zitten (waar de ijzers van je BH zitten), zoals ik gedaan heb in mijn versie van B5882. Wees gewaarschuwd dit is niet eenvoudig en je zal een aantal testversies moeten maken voor je de pasvorm helemaal juist hebt, maar eens dat het geval is zal je wel de ster van de avond zijn.

om af te sluiten een kleine preview van een versie waar ik zelf al even mee bezig ben. Ik ben vertrokken van de versie van Butterick maar ik heb de  buste verlaagd zodat hij meer zit zoals in de originele voorbeelden. De stof maakte ik zelf door kersjes op een gebroken witte katoen te stempelen.


Labels: , , ,

Saturday 7 January 2017

winkelwijs: stoffenwinkel of stoffenmarkt?

Om te kunnen naaien heb je natuurlijk de ideale stof nodig.  Bezoek je best een stoffenbeurs of een stoffenwinkel? Of toch liever online?

Stoffenwinkel of Stoffenbeurs of toch online?
De stoffenbeurs is een fantastische plek om stof te kopen: je vindt er een enorm aanbod van alle mogelijke stoffen en fournituren meestal voor een lagere prijs dan je ze in de stoffenwinkel kan kopen. Er is een mix van goedkope en duurdere stoffenkramen dus er is voor elk wat wils.

Een nadeel van de stoffenbeurs is wel dat het vaak enorm druk is en dat je vaak langer moet zoeken naar de ideale stof. Omdat er meer verschillende verkopers zijn hebben vele verkopers vaak hetzelfde bij of een kleiner aanbod.
De echte koopjes zijn vaak niet gelabeld en je weet dus niet altijd wat de samenstelling is (en wat de wasvoorschriften zijn) van de stof die je koopt. Het vraagt dus wel wat ervaring om de beste stoffen te herkennen en je kan maar zelden uitgebreid uitleg vragen aan de verkopers. Bovendien is de stoffenbeurs halfjaarlijks: je zal dus vooruit moeten plannen wat je gaat maken als je je stof her wil kopen.

Ook online kan je goedkope stof vinden, ze is altijd netjes gelabeld en je weet dus perfect wat de samenstelling van de stof is en dus hoe je het best voor de stof moet zorgen. Natuurlijk betaal je extra verzendkosten wat de prijs kan opdrijven en kan je niet van de ervaring van de verkopers profiteren. Een ander nadeel is dat je de stof niet kan voelen, dat zegt vaak veel meer over de kwaliteit en de eigenschappen van de stof dan je met woorden kan uitdrukken.

Als conclusie kunnen we dus stellen dat beide vormen van stof kopen hun voordeel hebben. De verkopers in de stoffenwinkel zijn vaak erg behulpzaam en door hun ervaring met naaien kunnen ze vaak zeggen of een stof geschikt gaat zijn voor het project dat je voor ogen hebt en zelfs hoe veel stof je ongeveer zal nodig hebben. De kans dat het resultaat een ramp is zal daardoor heel klein worden.

Daartegenover staat dat je op de stoffenbeurs erg goedkope stof kan vinden, wat je als beginner een veiliger gevoel geeft, als het resultaat een complete ramp is, heb je er niet veel geld aan uitgegeven en zijn er dus geen potten gebroken.

Tijd om te kiezen
Kies je voor de stoffenwinkel? typ even stoffenwinkel in in google maps en je vind meteen waar je terecht kan.

Als je zeker wil zijn dat je de volgende stoffenbeurs in de buurt niet mist volg dan zeker deze link. Tot dan! agenda stoffenspektakel

Of toch maar via internet? Zoek naar websites uit België of Nederland om de verzendkosten te beperken (.be of .nl) kijk zeker de verzendvoorwaarden na voor je begint te kiezen, zo bespaar je jezelf teleurstellingen.


Labels: , , , ,

Thursday 21 January 2016

The classic coat

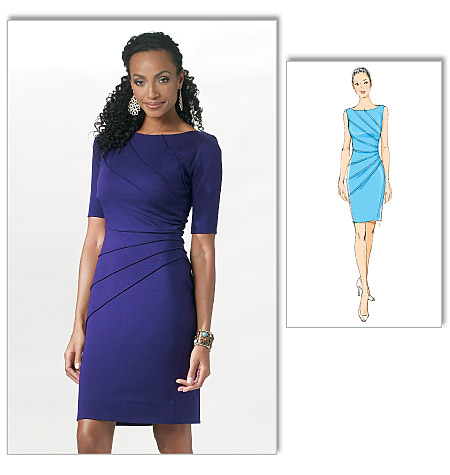
This pattern is the perfect basic for fit and flare style coats. Although the pattern picture is in my opinion very unflattering, the style looks lovely on almost any body type. I love the fit and flare for structured garments since it can really help creating the illusion of hips, shoulders or just accentuate the goodies that are already there.
This is the original illustration, I really do not like the long beige version, and the manic look on the girl in red is frankly scary, but, this pattern had such elegant and basic design lines when I looked at the line drawings, and had the longer fit and flare style I was admiring in retro coats I wanted so I decided to give it a try.


I liked the result so much that I offered to make 6 more for a dance show I was participating in. This challenge intrigued me since I would have to measure and fit 6 very different people, of age, style and body type. It was really fun to do, but also slightly nerve racking since I was sewing on a tight schedule and I was hugely afraid that they wouldn't like the result. I shouldn't have feared however. I does put me in the position to say that this pattern can be worn by anyone, with any shape or age and still look fabulous.

The instructions where pretty clear to me, it was my first time sewing a coat and also with wool and I referenced them quite heavily. I learned a lot, but some techniques could have been explained more thoroughly for a beginning sewist (setting in tailored sleeves,...) there are however tons of very educational blogs and videos around so I highly recommend those. I found that making a coat was not as daunting a task as I had imagined it would have been. My striped fabric made the cutting of the fabric a real challenge as well since I had gotten it in my head to match as many stripes as possible. This turned out pretty fine, if I say so myself.
Look ma! lovely stripes that match!
Even at the pockets!


One of the things that made sewing for so many so challenging was the sizing of this pattern since it's holds a very narrow range: you only get three sizes in an envelope so you've got to be pretty sure that your size group is the right one. There aren't any overlapping sizes so if your between sizes and one is in one envelope and the other in another you're out of luck. I've chosen size 8, but should have gone with size 6 since I've got a lot of room to spare even with massive winter sweaters on.

For fabric I used second hand wool out of an ancient stash for my own coat. Out of witch I was only able to squeeze slightly more than the shortest length. For the show I made these up in a cheap fabric with some body, they turned out to be pretty wearable as a mid season coats.

If you would ask me what I dislike about this coat (witch I've worn to death over the past two winters) I would be hard pressed, but I've managed to think of somethings...
 1. I've made it two inches short and it doesn't cover most of my dresses, so I look kind of layered like a Christmas tree.
2. Even though I made this in a wool and it's fully lined it's not nearly warm enough as is to be worn as a real winter coat. I've added an extra layer of padding to make it wearable but only realised i would have to do this at the time I was sewing the lining. I added the padding to the lining but this makes my coat look poofy and uneven. Not something I should have done as an afterthought. the coat was however meat to be a wearable muslin and it certainly has been worn a lot.
A direct result of this is that my seam is bunching up quite a lot in the front, I think this is due to the french tacks they make you do to the (much to heavy in my case) lining. This pulls the fabric down quite a bit, I omitted those in the picture of the show coat below and you can clearly see the difference.
3. I dislike that I can't turn back time and remake this with the sewing skills I have now, since it would turn out even better, but that isn't really a dislike, just an excuse to make another one soon...

Likes:
1. I loooooove the style, its retro, chic and classic at the same time the lines of the design are very feminine and elegant and look good on anybody.
2. There are a lot of design options in one envelope, this is (as advertised) a great pattern to start out with and modify, a true classic and it will no doubt be one of my turn to patterns for many years
3. I love my pattern matching, It's my secret, very nerdy source of happiness to know that I'm wearing a coat that has been carefully thought of an lovingly constructed and has no signs of 'wonky' stripes.
4.  I love how much I've learned making this and how much I've even learned more making this 6 times over and having to modify the one pattern to 6 wonderfully different shapes.
5. I love to be able to say that I've made myself a COAT!


I regret that I don't have a group picture of everyone in their coat, with all of the hustle and bustle there just wasn't time the day of the show.  I'll have to ask the lovely ladies to supply me with pictures of their own sometime... In the meantime a mug shot of one of the nearly finished coats in my studio...

I have to conclude that even though I've now sew this 7 times, I'd still sew it again. I'd love to have a warmer weather version, a longer version, a shawl collar version, a coat dress version, a colour blocked version and a faux fur cuff version (ofcouse everyone should have one of those right?). I wholeheartedly recommend this pattern to anyone, it's straigthforward, classic and a great starting point for so much more creativity.


Sunday 8 March 2015

Owlsome Summer Dress


 The project I've blogged about last week has been finished. I couldn't wait to wear this dress, so I had to sew obsessively until it was done. I had the chance today to wear it out at the zoo, since it was a freakishly warm and sunny winters day, I bullied my boyfriend to take pictures for me and here we are! It really felt like spring and I loved it! This dress has everything you would want in a fantastic summers dress, It's cute (owls), practical (pockets!), flattering and swirls around very nicely. The skirt would be perfect for a rock and roll dancing or a pick nick. The bodice is really deeply cut, but the gathered cups keep everything nice and modest.

This summer dress has a circle skirt and contrasting halter straps. The bodice is close fitting and features some gathers witch will make your breasts seam larger when they are small like mine.
I love the contrasting fabrics on the halter piece but I have been putting of the decision witch contrast fabric to use. In the end I went for a leftover fabric I already had in my stash and made my own owl decorations as you can read in my post on customising fabric. I felt that the contrast was not used enough witch left the design unbalanced, so I added another part in that fabric.

Since I'm already boasting about my fabric customisation, I LOVE my owl fabric. I think It really makes the dress more festive and fit for summer. (and It's not even spring here yet). I'm very happy with how this turned out. I was really afraid that it would look sloppy or very irregular. Instead the owls all get a unique character and I could strategically place my designs to make pattern matching easier. Or at least in theory. I ended up miscalculating a couple of times, but I still think It looks nice and anyway, hand painting your fabric makes you think twice about re cutting pieces.


I also love the design witch I think really suits my figure. It enhances both my hips and breasts and emphasises my waist. Since I'm a bit of a rectangle, I'm always grateful for clothes that make me look as if I've got real curves.  I did not have to make any pattern alterations for fit but I did end up overlapping the halter pieces several cm. I might have made them slightly to tight but this stopped the bodice from gaping and helped with modesty coverage. This is probably down to my relatively small breasts.

Oh and a plus for pockets!

dress inside out, click to enlarge
I also love the finished look the lined bodice has. I use a lot of facings and they never give such a clean finish. It involves a bit of extra work and a lot of extra fabric. But I think the result is worth it. To match this clean finish I tried out hong kong seams and a hong kong hem. I made some biasband from my contrast fabic for the seams and just sewed that on instead of zigzagging the whole piece. Sewing the seam together after went like a breeze. I really liked the finished look and I thought the amount of extra work was reasonable.
I did not have such a fine experience with the hong kong hem though. The pattern calles for a narrow hem of 1.5 cm and I already shortened my dress quite a bit. I did not want it to get much shorter. I cut out more than 3m of bias strips (with a width of 2.5 cm) and sewed them together. Then I sewed it to the hemline. Then I had to turn the strip in twice and turn the hem up 1 cm. This was very fidley work and turned out very time consuming. I also have the feeling that I did something wrong since the hem doesn't seam to flow properly. The result does look nice on the inside though. I'm going to try it with wider strips on a wider hem next time to asses whether this technique is always as tiresome.

If you are thinking of making this dress yourself beware of the pattern label. It's marked easy but some of the techniques are more for the experienced sewer and are not explained at all in the instructions. I'm talking about inserting the bodice into the halter pieces. This has to be done really neatly to give the dress a crisp finish. All other parts of the process are explained adequately though. If you are really determined there are always lots of amazing you tube technique video's to take you through the process...

I also spotted some missing pattern marks (or I might have overlooked them) on the back seam of the skirt. nothing too important though. The notch in the pocket is also in the wrong place according to me, just align the top of the pocket with the top of the skirt like in the picture and you should be fine though.

To sum things up:

I'm in love with the result. I learnt new techniques (although I broke two needles in the process). I have owls on my dress. I made a matching hair bow. In short this was a good experience. The pattern comes together fine and if you are willing to dare the rather advanced process of sewing in contrasting pieces, this dress is for you. Just be prepared to give it a couple of tries. The fabric pieces will mould together in the end. The result is certainly worth the trouble. I'm really in love with this dress at the moment and I would love to have another, I might make another view but I have agreed on sewing a large number of dresses for other people in the near future though so there will be next to no sewing for myself until June.


Labels: , , ,

Thursday 5 March 2015

The Little Tucked Dress

A while ago I was looking for patterns that would suit my figure. I usually look good in clothes that fit tightly since I'm so thin, but on the other hand, tight clothes sometimes make me look like I haven't got any curves. Not this pattern. Oh no.

I was looking through sewing pattern review when I noticed it, an intriguing, simple stile, made up by lots of different people but always with amazing results. hugging the right places and drawing the eye in a very flattering way, on everyone. the look is also casual enough for work, or just about anything, but still so sexy that you will definitely turn some heads. It can be dressed up or down with accessories to your liking. It's like a little tucked dress, everyone should have one!

Ok, enough raving enthusiasm. The pattern I'm talking about is Butterick 5559. Its a close fitting dress made out of a strech fabric of your liking. It has some very nice sunburst pleats that make the look stand out. The lines of the dress are really simplistic, a swallow boat neck and the option for a sleeved or sleeveless version.

since the design features such prominent tucks I was  a bit nervous about doing them. I had never done anything like that before. Previous reviews told me to take especial care while marking the lines. sewing them turned out to be surprisingly simple. I marked all lines with carbon paper and transferred the lines with pins to the good side of the fabric. Matching up the pins meant matching up the lines. then it was just a matter of carefully sewing down every tuck. I didn't need any additional explanations besides what was already in the pattern, so that's a surprising change. I sewed the whole dress in little over a day, cutting included so this dress came together fabulously easy for me. the hardest part was definitely getting the tucks to line up in the side seam. It took some tries especially for the waist tuck, but I finally got it almost right. Good enough for me :)

I used a stretch knit for this project. It has a weird kind of creases in it, witch I don't really like and feels velvety on one side. It's very comfortable and warm and hides all imperfections. It was a lucky find on a discount shelve so I have no idea what kind of fabric it actually is.

I didn't have to make a single adjustment for this pattern. No need to change perfection, wouldn't have known how to deal with changing the tucks and darts on this one anyway ;). Well actually I might have tampered with the hem length. In the end I just left my dress unhemmed, but I can't remember whether I had planned to shorten it or not.

To conclude:
This pattern seems to never disappoint. It was easy to make and the result is pretty nice. It's a shame that the pattern has been discontinued recently. If you get the chance to grab your own, do so you won't regret it.
Personally I would already love to have a second version in a more neutral colour, maybe gray. It feels super comfortable on and I have gotten lots of compliments with this dress. It's really not such a complicated design as it appears to be.
And the design is just perfect, I love the tucks as they give the dress a very distinguished look. I'd also seen lots of reviews of this pattern and every single dress looked stunning. Also I love the hidden darts. It felt like cheating hiding them in the tucks. Dresses like this are generally flattering for my figure but this dress has a huge wow factor. It somehow enhances everything that needs to be enhanced and magically looks awesome on everyone!

Some more pictures:


Labels: ,

Monday 2 March 2015

Fabric Customisation

I'm officially in love with the fabric I cooked up for my latest project!

I used to use fabric paint all the time to customise my ready to wear clothes but forgot almost all about it when I started to make my own. I've recently rediscovered this and I'm absolutely raving about the possibility to make my own unique designs!

I got the idea for this fabric while looking for inspiration for the perfect fabric match for my newest project. I stumbled across this very cute owl appliqué witch happened to have the colour of one of the fabric matches I was considering and I thought it would look cute on the dress together. I then got the craziest idea to create contrasting owls on the contrasting fabric pieces too.

To make this fabric I I traced the lines of the original appliqué I had on a plastic and cut out a template so I could easily paint a lot of these owls. I used gold, and green-blueish tints to make them. You can see the template in the picture below and owls in various stages of completion too. The trick is to use different layers of different colours to make up one design.

It took a lot of headaches and reverse fabric matching thinking to decide where all of these owls should go, since I did them directly on the pattern pieces I would be cutting out, but I think I did it! I drew the stitching lines on the good side of the fabric in chalk to match up the owls as efficiently as I could and I also drew up a matching aid on my dee through template to make sure I painted the owls on perpendicular to each other. I must say I'm very pleased with the result. The owls turned out cute, all of them unique since they were done by hand and O got to lazy to match them up perfectly witch gives them all their own personality.


I did almost ruin my fabric by following the instructions to fixate the paint. They wanted me to put the fabric in the oven for ten minutes. This luckily only resulted in a small piece of fabric witch came out slightly melted. Remind me to buy some decent cotton fabrics for once...

Sneak peak at the dress I'm constructing:


Also I've discovered the Hong Kong finish, experimenting with that too!


Labels: , , ,