01 02 03 Miss Smartie's Sewing 04 05 15 16 17 18 19 20 21 24 21 24 21 24 21 24 21 24 21 24 25 26 27 28 29

Miss Smartie's Sewing

30 31 32 36 32 36 32 36 32 36 32 36 32 36 37 38 body { background:#aba; margin:0; padding:20px 10px; text-align:center; font:x-small/1.5em "Trebuchet MS",Verdana,Arial,Sans-serif; color:#333; font-size/* */:/**/small; font-size: /**/small; } /* Page Structure ----------------------------------------------- */ /* The images which help create rounded corners depend on the following widths and measurements. If you want to change these measurements, the images will also need to change. */ @media all { #content { width:740px; margin:0 auto; text-align:left; } #main { width:485px; float:left; background:#fff url("https://resources.blogblog.com/blogblog/data/rounders/corners_main_bot.gif") no-repeat left bottom; margin:15px 0 0; padding:0 0 10px; color:#000; font-size:97%; line-height:1.5em; } #main2 { float:left; width:100%; background:url("https://resources.blogblog.com/blogblog/data/rounders/corners_main_top.gif") no-repeat left top; padding:10px 0 0; } #main3 { background:url("https://resources.blogblog.com/blogblog/data/rounders/rails_main.gif") repeat-y; padding:0; } #sidebar { width:240px; float:right; margin:15px 0 0; font-size:97%; line-height:1.5em; } } @media handheld { #content { width:90%; } #main { width:100%; float:none; background:#fff; } #main2 { float:none; background:none; } #main3 { background:none; padding:0; } #sidebar { width:100%; float:none; } } /* Links ----------------------------------------------- */ a:link { color:#258; } a:visited { color:#666; } a:hover { color:#c63; } a img { border-width:0; } /* Blog Header ----------------------------------------------- */ @media all { #header { background:#456 url("https://resources.blogblog.com/blogblog/data/rounders/corners_cap_top.gif") no-repeat left top; margin:0 0 0; padding:8px 0 0; color:#fff; } #header div { background:url("https://resources.blogblog.com/blogblog/data/rounders/corners_cap_bot.gif") no-repeat left bottom; padding:0 15px 8px; } } @media handheld { #header { background:#456; } #header div { background:none; } } #blog-title { margin:0; padding:10px 30px 5px; font-size:200%; line-height:1.2em; } #blog-title a { text-decoration:none; color:#fff; } #description { margin:0; padding:5px 30px 10px; font-size:94%; line-height:1.5em; } /* Posts ----------------------------------------------- */ .date-header { margin:0 28px 0 43px; font-size:85%; line-height:2em; text-transform:uppercase; letter-spacing:.2em; color:#357; } .post { margin:.3em 0 25px; padding:0 13px; border:1px dotted #bbb; border-width:1px 0; } .post-title { margin:0; font-size:135%; line-height:1.5em; background:url("https://resources.blogblog.com/blogblog/data/rounders/icon_arrow.gif") no-repeat 10px .5em; display:block; border:1px dotted #bbb; border-width:0 1px 1px; padding:2px 14px 2px 29px; color:#333; } a.title-link, .post-title strong { text-decoration:none; display:block; } a.title-link:hover { background-color:#ded; color:#000; } .post-body { border:1px dotted #bbb; border-width:0 1px 1px; border-bottom-color:#fff; padding:10px 14px 1px 29px; } html>body .post-body { border-bottom-width:0; } .post p { margin:0 0 .75em; } p.post-footer { background:#ded; margin:0; padding:2px 14px 2px 29px; border:1px dotted #bbb; border-width:1px; border-bottom:1px solid #eee; font-size:100%; line-height:1.5em; color:#666; text-align:right; } html>body p.post-footer { border-bottom-color:transparent; } p.post-footer em { display:block; float:left; text-align:left; font-style:normal; } a.comment-link { /* IE5.0/Win doesn't apply padding to inline elements, so we hide these two declarations from it */ background/* */:/**/url("https://resources.blogblog.com/blogblog/data/rounders/icon_comment.gif") no-repeat 0 45%; padding-left:14px; } html>body a.comment-link { /* Respecified, for IE5/Mac's benefit */ background:url("https://resources.blogblog.com/blogblog/data/rounders/icon_comment.gif") no-repeat 0 45%; padding-left:14px; } .post img { margin:0 0 5px 0; padding:4px; border:1px solid #ccc; } blockquote { margin:.75em 0; border:1px dotted #ccc; border-width:1px 0; padding:5px 15px; color:#666; } .post blockquote p { margin:.5em 0; } /* Comments ----------------------------------------------- */ #comments { margin:-25px 13px 0; border:1px dotted #ccc; border-width:0 1px 1px; padding:20px 0 15px 0; } #comments h4 { margin:0 0 10px; padding:0 14px 2px 29px; border-bottom:1px dotted #ccc; font-size:120%; line-height:1.4em; color:#333; } #comments-block { margin:0 15px 0 9px; } .comment-data { background:url("https://resources.blogblog.com/blogblog/data/rounders/icon_comment.gif") no-repeat 2px .3em; margin:.5em 0; padding:0 0 0 20px; color:#666; } .comment-poster { font-weight:bold; } .comment-body { margin:0 0 1.25em; padding:0 0 0 20px; } .comment-body p { margin:0 0 .5em; } .comment-timestamp { margin:0 0 .5em; padding:0 0 .75em 20px; color:#666; } .comment-timestamp a:link { color:#666; } .deleted-comment { font-style:italic; color:gray; } .paging-control-container { float: right; margin: 0px 6px 0px 0px; font-size: 80%; } .unneeded-paging-control { visibility: hidden; } /* Profile ----------------------------------------------- */ @media all { #profile-container { background:#cdc url("https://resources.blogblog.com/blogblog/data/rounders/corners_prof_bot.gif") no-repeat left bottom; margin:0 0 15px; padding:0 0 10px; color:#345; } #profile-container h2 { background:url("https://resources.blogblog.com/blogblog/data/rounders/corners_prof_top.gif") no-repeat left top; padding:10px 15px .2em; margin:0; border-width:0; font-size:115%; line-height:1.5em; color:#234; } } @media handheld { #profile-container { background:#cdc; } #profile-container h2 { background:none; } } .profile-datablock { margin:0 15px .5em; border-top:1px dotted #aba; padding-top:8px; } .profile-img {display:inline;} .profile-img img { float:left; margin:0 10px 5px 0; border:4px solid #fff; } .profile-data strong { display:block; } #profile-container p { margin:0 15px .5em; } #profile-container .profile-textblock { clear:left; } #profile-container a { color:#258; } .profile-link a { background:url("https://resources.blogblog.com/blogblog/data/rounders/icon_profile.gif") no-repeat 0 .1em; padding-left:15px; font-weight:bold; } ul.profile-datablock { list-style-type:none; } /* Sidebar Boxes ----------------------------------------------- */ @media all { .box { background:#fff url("https://resources.blogblog.com/blogblog/data/rounders/corners_side_top.gif") no-repeat left top; margin:0 0 15px; padding:10px 0 0; color:#666; } .box2 { background:url("https://resources.blogblog.com/blogblog/data/rounders/corners_side_bot.gif") no-repeat left bottom; padding:0 13px 8px; } } @media handheld { .box { background:#fff; } .box2 { background:none; } } .sidebar-title { margin:0; padding:0 0 .2em; border-bottom:1px dotted #9b9; font-size:115%; line-height:1.5em; color:#333; } .box ul { margin:.5em 0 1.25em; padding:0 0px; list-style:none; } .box ul li { background:url("https://resources.blogblog.com/blogblog/data/rounders/icon_arrow_sm.gif") no-repeat 2px .25em; margin:0; padding:0 0 3px 16px; margin-bottom:3px; border-bottom:1px dotted #eee; line-height:1.4em; } .box p { margin:0 0 .6em; } /* Footer ----------------------------------------------- */ #footer { clear:both; margin:0; padding:15px 0 0; } @media all { #footer div { background:#456 url("https://resources.blogblog.com/blogblog/data/rounders/corners_cap_top.gif") no-repeat left top; padding:8px 0 0; color:#fff; } #footer div div { background:url("https://resources.blogblog.com/blogblog/data/rounders/corners_cap_bot.gif") no-repeat left bottom; padding:0 15px 8px; } } @media handheld { #footer div { background:#456; } #footer div div { background:none; } } #footer hr {display:none;} #footer p {margin:0;} #footer a {color:#fff;} /* Feeds ----------------------------------------------- */ #blogfeeds { } #postfeeds { padding:0 15px 0; }

Friday, 20 January 2017

Hoe herken je een vintage jurk (of kwaliteit retro)

In een vintage jurk vinden we vaak een aantal specifieke elementen terug die de jurk het gewenste silhouet geven. Deze technieken zijn gebruikt met als doel de jurk meer stabiliteit te geven en draagbaarder te maken maar bepalen ook de vorm van het kledingstuk.Dit maakt oude jurken vaak van betere kwaliteit, natuurlijk kan je het ook gewoon allemaal zelf doen.

stevig katoen als basislaag met polyester balleinen als tunnel voor sterkere plastieken balleinen.
1. Stevige katoenen interfacing of voering
Een tussenlaag of voering laag van katoen wordt soms gebruikt om meer structuur te geven aan een dunne soms doorschijnende stof. Niet alleen wil je natuurlijk niet dat iedereen kan zien welke kleur ondergoed je aanhebt onder je jurk, de stof zorgt er ook voor dat de wijde rok vanzelf meer volume krijgt. Bovendien kan het nauw aansluitend lijfje nu ook echt dienstdoen als stevige onderkleding.
2. Balleinen
Alle jurken zonder mouwen werden vroeger gemaakt met een vorm van balleinen. Dit zorgt ervoor dat de jurk op zijn plaats blijft als je beweegt en niet afzakt of ronddraait. Het is belangrijk dat de jurk zelf wel ruim genoeg is om te blijven bewegen maar de balleinen zorgen ervoor dat alles netjes op zijn plaats blijft.

tailleband (foto sewaholic)
3. Tailleband
Deze extra interne riem zit strak rond je taille. Je verankert de jurk op je taille zodat de structuur van onderaf gedragen wordt en niet afzakt of zo strak zit dat je helemaal platgedrukt wordt.
Stiekem vleugje kleur 
4. (Losse) petticoat
Het wespentaille silouhet van de jaren 50 wordt vooral gemaakt door het sterke contrast van de nauwsluitende lijfjes met de sculpturale rokken. Door een onderrok van tulle te dragen wek je de illusie van volume en een kleurrijke petticoat zorgt voor een leuk extra origineel kantje aan je outfit

5. Geen blinde rits
Ik ben een enorme fan van blinde ritsen, ze zijn erg onopvallend en geven de mooiste afwerking aan je kledingstuk. Spijtig genoeg zijn ze niet erg sterk en niet bedoeld om veel kracht op te vangen. Als je lijfje erg strak zit kan een blinde rits splijten (en het laatste wat je wil is letterlijk uit je kleren barstten). Dat wil niet noodzakelijk zeggen dat je jurk niet past, de rits was gewoon niet gemaakt om zo'n dramatisch silouhet te ondersteunen.

6. Extra laagjes waar nodig
Als je geen of aangepast ondergoed moet dragen onder een jurk is het belangrijk om de juiste ondersteuning te voorzien. Een dunne laag stof waaronder alles zichtbaar is is misschien niet zo naar je zin. Hier gebruik ik stevige katoen en een dunne fleece om een gevulde cup te maken waar ik mezelf comfortabel in kan blijven voelen zelfs met aangepast ondergoed.

7. De juiste print
Een retro kleedje is pas helemaal af als het een leuke print heeft. Laat je helemaal gaan met bolletjes, streepjes, fruit of schattige dieren of combineer met contrasterende kleuren voor de details.

Labels: , , , ,

Saturday, 14 January 2017

Dressing the decade: The 50s - The Shelf bust dress

Wie houd van een beetje retro-glamour is waarschijnlijk wel bekend met de glamoureuze cirkelrokken en de smalle tailles van de jaren '50. Dit typische silhouet ontstond als reactie op de praktische vrouwenmode uit de jaren '40 vrouwen kozen ervoor om hun vormen te benadrukken en vaak te overdrijven. Dat gebeurde dan ook met behulp van de juiste onderkleding. De modellen uit deze periode hebben niet allemaal de perfecte wespentaille die ze lijken te hebben: ze dragen een corselette van stugge stof om hun buik plat te houden en een petticoat van crinoline die de volle rokken bol deed staan, wat de heupen accentueert en verbreed.

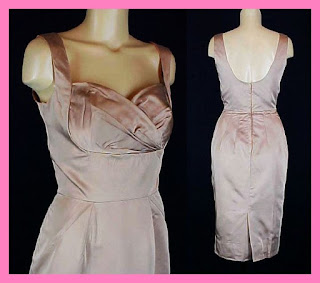
Een trend die bij deze mode paste is de shelfbust wat losvertaald de uitstalrekjurk of platter de schabjurk zou kunnen worden. Zoals de naam suggereerd is deze jurk bedoeld om de vrouwelijke vormen uit te stallen. Dit gebeurd door plooien of volumineuze stof in de borststreek in contrast met een lijfje dat onder de borst nauwsluitend is. Om van een echte 'shelf bust' te spreken moet er onder de borst een soort van decoratie zitten die de borst lijkt te ondersteunen en omkadert. Dit trekt niet alleen de aandacht maar suggereert ook volume. De trent heeft maar relatief kort bestaan in de bloeiperiode van het decennium, maar we kunnen er toch wel veel sporen van terugvinden.

Hierboven zien we een naaipatroon uit 1945 en het stijlicoon Elisabeth Taylor in een heel gelijkaardige jurk. Hieronderonder vind je nog enkele voorbeelden van jurken uit de periode, de ene al wat extravaganter dan de ander.


Wie deze look ook eens wil uitproberen kan zijn eigen versie maken met de hulp van Butterick 5882 (links) of Simplicity 1155 (rechts).


Ikzelf heb het butterick patroon gebruikt voor mijn versie van deze look. Wat je wel nog moet weten: de moderne patronen vergroten de borsten niet zo zeer als de originele stijl uit de 50ies. De naad die de onderkant van de borst moet volgen loopt bij deze twee patronen over het midden van de borst, wat hem net kleiner doet uitkomen. Voor de welvoorziene dames onder ons is dat misschien prettig want de jurk is zo uitermate geschikt om de aandacht te trekken maar zal er niet vulgair of ongepast uitzien. Wie iets meer borst wil suggereren kan het patroon best aanpassen zodat de naad van het bovenstuk lager komt de zitten (waar de ijzers van je BH zitten), zoals ik gedaan heb in mijn versie van B5882. Wees gewaarschuwd dit is niet eenvoudig en je zal een aantal testversies moeten maken voor je de pasvorm helemaal juist hebt, maar eens dat het geval is zal je wel de ster van de avond zijn.

om af te sluiten een kleine preview van een versie waar ik zelf al even mee bezig ben. Ik ben vertrokken van de versie van Butterick maar ik heb de  buste verlaagd zodat hij meer zit zoals in de originele voorbeelden. De stof maakte ik zelf door kersjes op een gebroken witte katoen te stempelen.


Labels: , , ,

Sunday, 8 March 2015

Owlsome Summer Dress


 The project I've blogged about last week has been finished. I couldn't wait to wear this dress, so I had to sew obsessively until it was done. I had the chance today to wear it out at the zoo, since it was a freakishly warm and sunny winters day, I bullied my boyfriend to take pictures for me and here we are! It really felt like spring and I loved it! This dress has everything you would want in a fantastic summers dress, It's cute (owls), practical (pockets!), flattering and swirls around very nicely. The skirt would be perfect for a rock and roll dancing or a pick nick. The bodice is really deeply cut, but the gathered cups keep everything nice and modest.

This summer dress has a circle skirt and contrasting halter straps. The bodice is close fitting and features some gathers witch will make your breasts seam larger when they are small like mine.
I love the contrasting fabrics on the halter piece but I have been putting of the decision witch contrast fabric to use. In the end I went for a leftover fabric I already had in my stash and made my own owl decorations as you can read in my post on customising fabric. I felt that the contrast was not used enough witch left the design unbalanced, so I added another part in that fabric.

Since I'm already boasting about my fabric customisation, I LOVE my owl fabric. I think It really makes the dress more festive and fit for summer. (and It's not even spring here yet). I'm very happy with how this turned out. I was really afraid that it would look sloppy or very irregular. Instead the owls all get a unique character and I could strategically place my designs to make pattern matching easier. Or at least in theory. I ended up miscalculating a couple of times, but I still think It looks nice and anyway, hand painting your fabric makes you think twice about re cutting pieces.


I also love the design witch I think really suits my figure. It enhances both my hips and breasts and emphasises my waist. Since I'm a bit of a rectangle, I'm always grateful for clothes that make me look as if I've got real curves.  I did not have to make any pattern alterations for fit but I did end up overlapping the halter pieces several cm. I might have made them slightly to tight but this stopped the bodice from gaping and helped with modesty coverage. This is probably down to my relatively small breasts.

Oh and a plus for pockets!

dress inside out, click to enlarge
I also love the finished look the lined bodice has. I use a lot of facings and they never give such a clean finish. It involves a bit of extra work and a lot of extra fabric. But I think the result is worth it. To match this clean finish I tried out hong kong seams and a hong kong hem. I made some biasband from my contrast fabic for the seams and just sewed that on instead of zigzagging the whole piece. Sewing the seam together after went like a breeze. I really liked the finished look and I thought the amount of extra work was reasonable.
I did not have such a fine experience with the hong kong hem though. The pattern calles for a narrow hem of 1.5 cm and I already shortened my dress quite a bit. I did not want it to get much shorter. I cut out more than 3m of bias strips (with a width of 2.5 cm) and sewed them together. Then I sewed it to the hemline. Then I had to turn the strip in twice and turn the hem up 1 cm. This was very fidley work and turned out very time consuming. I also have the feeling that I did something wrong since the hem doesn't seam to flow properly. The result does look nice on the inside though. I'm going to try it with wider strips on a wider hem next time to asses whether this technique is always as tiresome.

If you are thinking of making this dress yourself beware of the pattern label. It's marked easy but some of the techniques are more for the experienced sewer and are not explained at all in the instructions. I'm talking about inserting the bodice into the halter pieces. This has to be done really neatly to give the dress a crisp finish. All other parts of the process are explained adequately though. If you are really determined there are always lots of amazing you tube technique video's to take you through the process...

I also spotted some missing pattern marks (or I might have overlooked them) on the back seam of the skirt. nothing too important though. The notch in the pocket is also in the wrong place according to me, just align the top of the pocket with the top of the skirt like in the picture and you should be fine though.

To sum things up:

I'm in love with the result. I learnt new techniques (although I broke two needles in the process). I have owls on my dress. I made a matching hair bow. In short this was a good experience. The pattern comes together fine and if you are willing to dare the rather advanced process of sewing in contrasting pieces, this dress is for you. Just be prepared to give it a couple of tries. The fabric pieces will mould together in the end. The result is certainly worth the trouble. I'm really in love with this dress at the moment and I would love to have another, I might make another view but I have agreed on sewing a large number of dresses for other people in the near future though so there will be next to no sewing for myself until June.


Labels: , , ,

Monday, 16 February 2015

The Heart skirt: measurements, notions and pattern

As I've explained in my first post about my measurement system, I wanted to make sure everybody uses their correct measurements by not using a standard sizing system. This may sound inconvenient, but I wanted to prevent you from just selecting your standard size, and not ending up with a garment that actually is your size. This is mostly down to all sizes differing from country to country. I've also not skipped the uneven numbers, so be aware of that! Oh and your size will appear to be smaller too!

When making your own clothes it's really important to get the fit right. To customise your pattern to fit your unique body. You will have to measure yourself to know witch size you are. Please believe me that the result will look better on you if you use the size your body actually has an not the size you want your body to have.

In the following table you will find the final measurements of this pattern. All measurements are given in centimetres. You don't have to account for wearing ease when taking your measurements, the stretch fabric will take care of that. Please select the size witch is closest to your own waist, scaling down (or up) the hip area by moving up or down a size (or more) at the point were the skirt is the curviest and reattaching all lines smoothly.


12345678910
Waist58 626670747882869094
Hip86909498102106110114118122

for this project you will need:

  • One meter of fabric unless you plan on doubling up the fabric in wich case 1.5m should be ok for all sizes. 
  • A smaller piece of less heavy fabric sized 18 by 100 cm for sizes 1-5 (or 36 by 50cm) and sized 24 by 100 cm or (42 by 50 cm) this fabric can have dots or you can paint them on yourself.
  • white fabric paint, if your lighter fabric doesnt have dots already.
  • a cotton tipped swab (like the ones to clean your ears) to make the perfect dots
  • a white fabric ribbon. not the plasticy kind, it has to adjust itself to the round shapes.
  • an invisible zipper max. 22 cm long.
  • The pattern found here: pattern for all sizes

Labels: , , , ,

Tuesday, 13 January 2015

The Secretary Blouse: Construction Part Two: Sewing Instructions

All seam allowances of 1,5 cm are included in the pattern if not specified all seams should measure 1.5 cm.
If your fabric frays zig zag all pieces first.
In the illustration:
white pieces = right side of fabric showing
grey pieces= wrong side of fabric showing
blue parts= interfacing

Collar


1. Pin lower collar (7) to upper collar (10) matching symbols. Match interfaced pieces with interfaced pieces and non interfaced pieces with non interfaced ones. Stitch between circle and square. Press seam open.

2. Pin the interfaced collar pieces to the non interfaced collar pieces. Match all symbols. Cut in 1.3 cm at inner corner to be able to press seam flat. Stitch over the edges, breaking stitching at the square (inner corner) to make a couple of backstitches securing this point. Trim edges, turn right side out and press.

3. Baste neck edge.

Facing

1. Finish lower edges on back facing (8) and front facing (9) (with bias, zig zag or overlock).

2. Stitch front facing (9) to back facing (8) matching symbols. Press this seam open.

Body 

1. Pin front (2) pieces to side front (3) pieces matching symbols. Stitch between circles. Unpin unstitched seam. Press to center front.


2. Stitch back (4) to side back (3) with a French seam:
      2a. Pin back to side back right sides of fabric showing. Stitch 0.5 cm from edge.
      2b. Turn wrong side out, press along seam and stitch again 1 cm from edge.


3. Stitch shoulders matching triangles and notch to French seam. Press this seam open.

4. With body spread out as shown in the illustration pin collar to body matching symbols (circles and triangles). Pin collar on fabric with the interfaced collar pieces at the bottom. Pin facing over body and collar, matching symbols and shoulder seams. Stitch making sure the layers won't get caught in stitching. (illustration is showing pinned collar only on right side and facing on left side.)

5. Trim the inner corner of front piece as sown on illustration. Trim though all layers of fabric.

6. Turn facing to inside of garment. Match with side and armhole seams. Baste facing to body of garment at 1 cm of the edge. Press the collar, right side out.

7. Close side seams.

8. Pin seam between left (when facing the garment right side out and front to back) front (2) and left side front (1) from circle down, press to the left.  Pin left edge of right front piece (2) over this seam, matching edges of fabric. Stich seam.

 9. Pin  left side of left front (2) with wrong side on right side of right front (2). Turn garment inside out. Close seam between rigt front (2) and right side front (1) replacing the pins keeping left front sandwiched between. Stitch.

Sleeves

1. Pin cuff (6) pieces together matching interfaced with non interfaced cuff, leaving the top open. Stitch 1.5 cm from the edge stitching over the edges. Trim, turn right side out and press.

3. Press under 1.5 cm seam allowance at the top.

4. Stitch side seam of sleeves. Cut lower edge of sleeve until circle.

5. Sandwich lower edge of sleeve between cuff. Top stitch 0.5 cm from edge of cuff.


6. Set in sleeve matching notches and circle to shoulder seam. Stitch easing in fabric at top of sleeve.

Finish

Finish with a 4 cm double folded seam: Measure off 2 cm of lower edge of garment. Press this under. press this under again. Top stitch at 1.5 cm from lower edge.

Labels: , , , ,

The Secretary Blouse: construction part one: pattern, fabric, markings and interfacing.

Preparing the pattern

cutting of the white paper strip
Print the pattern using your normal settings on your regular printer. You can print in black and white to save colours.

Tape together the pattern pieces you have printed. You will have to cut off the excess blank 0.5 cm on the edge of your paper, if you only need to do this on the left and upper sides of your paper since you can overlap the remaining white spaces.


matching pattern lines while taping papers together
The pattern was deliberately made to overlap seen as many printers won't print the outer 0.5 cm that would mean losing 0,5 cm of the design. If your printer somehow does print these 0.5 cm you will still have to overlap the pattern pieces this much.

Paste everything together with tape making sure all pattern lines run continiously. You should first tape seven papers together for the first row and then continue to make a second and later a third row.

first row of largest pattern range

After taping everything together you can cut out the pattern pieces. If you are making one size cut out that size (you will recognise it by the colour and the dots in the line) as securely as possible. If you want to make adjustments for a better fit since your size was not the same at bust and waist you can find a tutorial on  how to do this here. (under construction)


Cutting out the fabric


Arrange your pieces on the fabric. The more experienced sewers can use the pattern layout above, witch I used for my fabric of  150cm wide. I did make one of the smaller sizes so that might make a difference.

If you buy 1,5 m fabric I think you will have plenty for this design in all sizes. I certainly didn't use as much but one meter would not have been enough. (In the end I used 90 cm of the full with of the fabric and a square of 60 by 60 cm for a size 2).

Fold your fabric in half from selvage to selvage with the good side of the pattern on the inside the stretch of your fabric should go horizontally. Lay out the pattern pieces as they have been drawn on the first picture above. Make sure you align the arrows perpendicular to the selvages (edges) of your fabric. Pattern pieces with arrows pointing to one straight edge have to be cut on the fold. Place these pieces on the fold you made in your fabric. If you are happy with the placement cut these pieces out, leaving the pattern attached.

Fold the remaining fabric over 30 cm with the right side in. Lay out the pattern pieces like the second drawing (bottom left). You might have to redo the fold to make sure all pieces fit. Cut these out too. Fold the remaining fabric over again, now folding over 45 cm. Cut out the remaining pattern pieces (picture bottom right).

Interfacing

You should use a pretty stiff interfacing for this pattern since the collar really needs to stand out. It doesn't necessarily have to be a stretch interfacing for the collar pieces (7 and 10) but I would recommend using a stretch interfacing on the cuff piece (6) since that will need to accommodate some wearing stretch when moving your arms.

Cut out interfacing as seen in the layout on the left. You will also need to cover 2 cm of the facing pieces (8 and 9) to stabilize the neckline. (this is visible in the picture as blue shaded areas) you can use scrap interfacing here if you like, putting the edge of the pattern piece on the interfacing and tracing it. You can also use two different straps for piece 9 one horizontal and one vertical if you overlap both slightly to save interfacing.

The next step is to apply the interfacing, this is mostly done by fusing (ironing) it to the fabric. Make sure you iron on the smooth side/ non shiny side, otherwise the glue will stick to your iron! You should also have mirror images of the facing for pieces 7 and 9.

Markings

Transfer all markings (circles, triangles and squares) with your preferred method. I like to use carbon paper since it's easy. I put the fabric and pattern pieces on top of the carbon paper, trace around the markings, remove the pattern, turn over the fabric (with pins still in) putting the unmarked side on top of the carbon paper and then trace around the first markings. It's important to note that all markings should be made on the wrong side of the fabric.
Cut out all notches (small triangles stuck to the edge of your pattern).

Labels: , , , , ,